
Gauge Does Matter
Knitters often confess to me that they never knit a gauge swatch. While this does not surprise me, I AM surprised that most knitters fail to fully understand the implications of omitting this crucial step.
Most importantly, improperly sized stitches will yield a piece in a size different than the stated measurements in the pattern. Spending countless hours knitting a garment that doesn’t fit is no one’s idea of fun. Also, many knitters neglect to swatch for projects that aren’t required to “fit”, such as scarves, shawls, blankets, etc. While the gauge may not be crucial to the outcome of these items, it has a huge impact on the amount of yarn used. Because larger (loose)stitches use more yarn it may result in a yarn shortage. Who wants to run out of yarn with just a few rows remaining? Taking the time to assess the stitches prior to the project will produce a piece that fits well, with optimum stitch appearance, and knit within the stated yardage.
What is Gauge?
See Gauge video
Gauge is the number of stitches and rows per inch in the fabric. A designer will provide a stated gauge to achieve the intended size and drape of the piece. While most gauges are worked in stockinette, some designers list other stitch patterns to provide a truer measurement, especially if no stockinette is used in the garment. Many gauges are listed as a count of stitches and rows over a 4” square. This larger swatch gives a more accurate stitch count.
Three factors determine the gauge: yarn, needles, and your unique tension. Trying to adjust your knitting tension is not a reliable method to achieve the stated gauge. Let’s face it – we walk the way we walk, talk the way we talk, and knit the way we knit. Your knitting tension is as individual as a fingerprint and trying to consciously knit looser or tighter than usual is a tall order. The best approach to matching gauge is to adjust needles and yarn.
The Swatch
A swatch is a piece of test knitting where a knitter works to reach the stated gauge in a pattern. In addition to the vital gauge numbers, a swatch is a preview of the fabric’s drape, stitch definition and overall appearance.
Needles
A swatch should be knit up in the needles that you will be using for the project. Different needle materials can have an impact on the size of the stitches. For some knitters, bamboo needles grip the stitches and yield tighter stitches while metal needles release the stitches quickly leaving looser stitches. For example, if you intend to knit a sweater on metal needles then a gauge knit on bamboo needles may not give the same results.
The pattern’s gauge will state the needle size that the designer used to reach this gauge. It is not a failure if your gauge is met using a different sized needle than those recommended in the pattern. For all you know, this designer could be a very tight or loose knitter. It is only important that you reach the same number of stitches per inch.
When preparing to cast on for the swatch, most knitters will begin with the recommended needle size for their swatch. If you have enough knitting experience to know that you are usually a tight or loose knitter, then save some swatching time by making this adjustment for the first attempt.
A project that will be knit flat should be swatched in flat knitting. If the project is knit circularly, then the swatch should be knit in the round as well. In circular knitting, stockinette is knit without working a purl round. For most knitters, the purl stitch is slightly larger and its absence will impact the stockinette gauge. I will be discussing flat gauge here, but watch my Circular Gauge Knit Flat video for a tutorial.
Casting On
For an accurate stitch count, the swatch should be measured across the center of the swatch away from all of the edges. The cast on, bind off and side stitches are usually distorted and should not be used for the gauge.
For a large measurable area, I recommend knitting a swatch that is 6” wide. Cast on enough stitches to produce a piece this large. For example, if the desired gauge is 5 stitches to the inch then casting on at least 30 stitches is a good swatch foundation. If the swatch is to be knit in stockinette, I like to frame it in seed stitch for flat lying edges that make the center easy to measure. I avoid garter stitch edges since it has a much smaller row gauge that distorts the swatch.
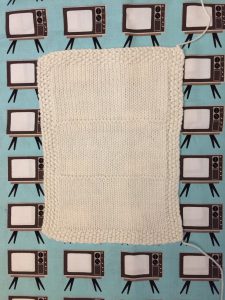
For the swatch pictured above, the pattern stated a gauge of 22 stitches to 4”. I cast on 38 stitches: 30 center stitches + 4 seed stitches on each end. The lower section was knit with my initial needle size where I found that the stitches were too small thus yielding too many stitches per inch. Time to try a larger sized needle. I continued on the same swatch, placing a garter ridge to show where I changed needle sizes. The middle section used a needle one size larger but I was still off target. Next, another ridge and another size larger needle. Bingo, I got my stitch gauge on the third try!
Once I have achieved the stated gauge, I like to block the swatch to verify that the count will remain the same. Sometimes, I block a swatch that is near gauge to coax it into the exact gauge. If the pattern lists the measurements are after blocking, then you can expect that swatch to behave differently after blocking.
Row Gauge
Many patterns give a stitch and row count per inch(es). While both are important, it is more important to match the stated stitch count. After swatching, the stitch count is often spot on, but the row gauge may be off.
If the row gauge is slightly different, try experimenting with a different needle size or an alternate needle material to see if that will impact the rows. Also, try blocking the swatch to determine if it can be coaxed into the required row gauge.
If the row gauge is significantly different than the stated gauge, the pattern may be knit with some precautions taken. If a project states to knit to a desired length, then the row gauge will not be a factor. However, if the pattern has shaping based on the row gauge then the frequency of the shaping must be altered. For example, a looser row gauge (less rows per inch) will make the piece longer between each increase or decrease. If a pattern directed you to decrease one stitch every four rows, this loose row gauge will result in a longer shaping area. Decreasing more frequently, (perhaps every third row) will combat this issue and reduce the correct number of stitches in the desired length of knitting. (This is a full lesson for another day!)
Final Tips
- Your gauge may change as you become accustomed to the yarn and stitch pattern. Check your gauge mid-project to confirm that your gauge is unchanged.
- A larger needle makes bigger stitches, which are fewer stitches per inch.
- A smaller needle makes smaller stitches, which are more stitches per inch.