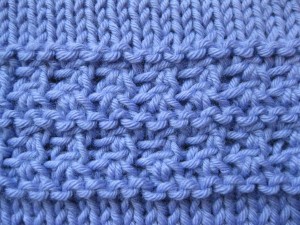
With our lovely knot stitch section complete (pictured above), it’s time to add our last section of texture using a slip stitch pattern. Slip stitch patterns are simple and quick to knit and are the basis for many solid and multi-colored designs.
A slip stitch moves a stitch from the left hand needle to the right hand needle without working the stitch. This simple little stitch can cause confusion and it is best to learn its general rule.
Slip Stitch Rule
On the right side of the work, always slip as if to purl with yarn in back unless otherwise stated.
On the wrong side of the work, always slip as if to purl with yarn in front unless otherwise stated.
A stitch is slipped as if to purl so that it is seated correctly on the right hand needle and ready to be worked in the subsequent row. When a stitch is slipped as if to knit, the stitch becomes twisted. These twisted stitches are often used in decreases or to create a design element and fall into the “otherwise stated” category. When following the Slip Stitch Rule, the working yarn is always on the wrong side of the work keeping the resulting strands hidden. Changing the location of the yarn, in an “otherwise stated” position, makes for many interesting design possibilities.
In this pattern you are directed to slip one (sl 1). The Slip Stitch Rule dictates to slip this stitch as if to purl and I have helped you by including directions for the location of the working yarn. Every sl 1 is followed by the abbreviaton wyif or wyib. These abbreviations tell you where to keep the working yarn as you slip the stitch. Wyif, with yarn in front, means the working yarn must be on the nearside of the work (closest to you) before the stitch is slipped. Wyib, with yarn in back, means that the working yarn must be on the far side of the work (away from you) before the stitch is slipped.
To review the slip stitch watch the “Slip Stitch” Video.
Part Three
Click here to download printable version
sl – slip. See “Slip Stitch” Video
wyib – with yarn in back.
wyif – with yarn in front.
Section 6. Garter Slip Stitch – 26 rows
Row 51. K2, SM, M1L, knit to 2nd marker, M1R, SM, k1, SM, M1L, knit to 4th marker, M1R, SM, k2. (177 sts)
Row 52. K2, SM, M1L, knit to 2nd marker, SM, k1, SM, knit to 4th marker, M1R, SM, k2. (179 sts)
Row 53. K2, SM, M1L, k1, *sl 1 wyib, k1; repeat from * to 2nd marker, M1R, SM, k1, SM, M1L, k1, **sl 1 wyib, k1; repeat from ** to 4th marker, M1R, SM, k2. (183 sts)
Row 54. K2, SM, M1L, sl 1 wyif, *k1, sl 1 wyif; repeat from * to 2nd marker, SM, k1, SM, sl 1 wyif, **k1, sl 1 wyif; repeat from ** to 4th marker, M1R, SM, k2. (185 sts)
Row 55. Same as Row 51. (189 sts)
Row 56. Same as Row 52. (191 sts)
Row 57. K2, SM, M1L, sl 1 wyib, *k1, sl 1 wyib; repeat from * to 2nd marker, M1R, SM, k1, SM, M1L, sl 1 wyib, **k1, sl 1 wyib; repeat from ** to 4th marker, M1R, SM, k2. (195 sts)
Row 58. K2, SM, M1L, k1, *sl 1 wyif, k1; repeat from * to 2nd marker, SM, k1, SM, k1, **sl 1 wyif, k1; repeat from ** to 4th marker, M1R, SM, k2. (197 sts)
Row 59. Same as Row 51. (201 sts)
Row 60. Same as Row 52. (203 sts)
Row 61. Same as Row 53. (207 sts)
Row 62. Same as Row 54. (209 sts)
Row 63. Same as Row 51. (213 sts)
Row 64. Same as Row 52. (215 sts)
Row 65. Same as Row 57. (219 sts)
Row 66. Same as Row 58. (221 sts)
Row 67. Same as Row 51. (225 sts)
Row 68. Same as Row 52. (227 sts)
Row 69. Same as Row 53. (231 sts)
Row 70. Same as Row 54. (233 sts)
Row 71. Same as Row 51. (237 sts)
Row 72. Same as Row 52. (239 sts)
Row 73. Same as Row 57. (243 sts)
Row 74. Same as Row 58. (245 sts)
Row 75. Same as Row 51. (249 sts)
Row 76. Same as Row 52. (251 sts)
STOP!
We finish our shawlette next week with a fun bind off. Happy knitting!


