
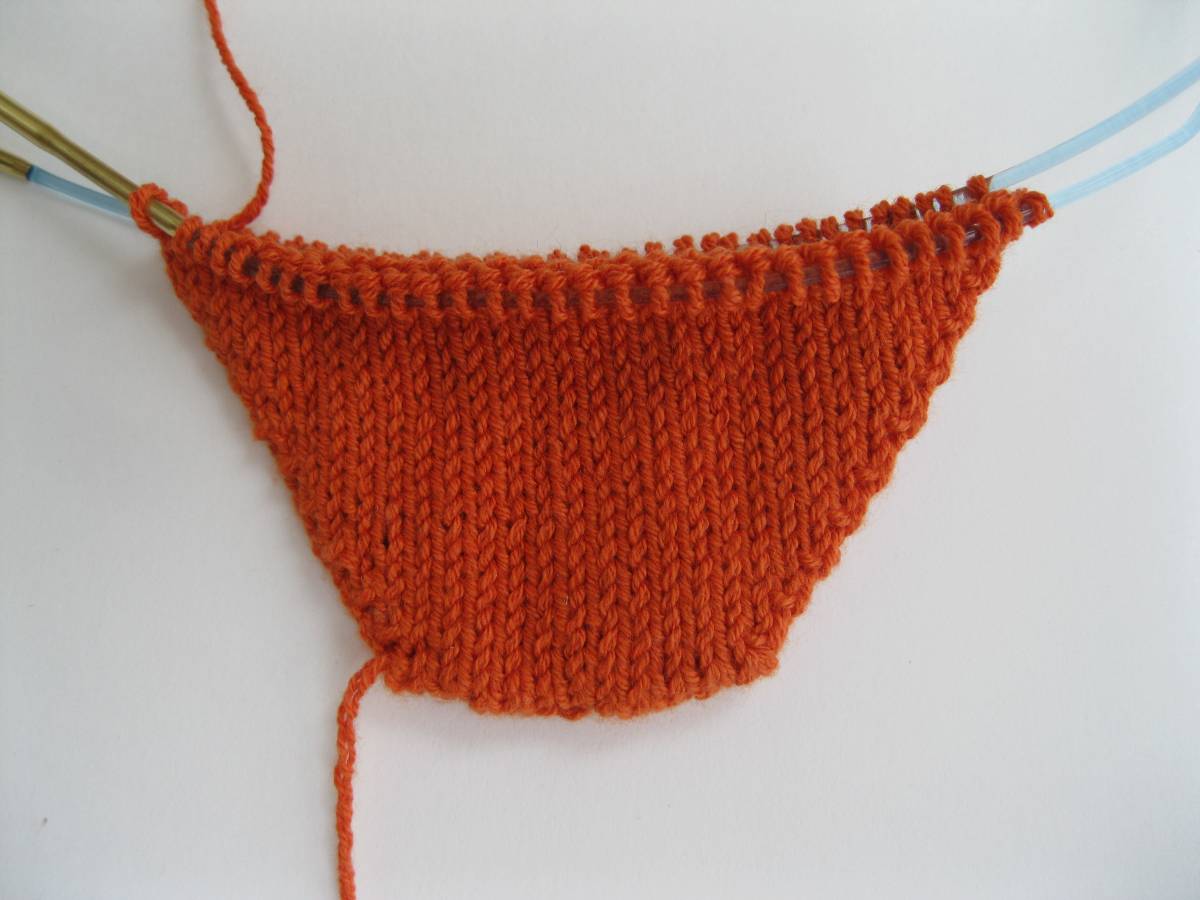
I hope you enjoyed knitting Crimple’s ribbed toe! The upper photo shows the instep (top of the foot) and the lower photo shows the sole (bottom of the foot). Part Two brings us the Foot with an instep design that flows right out of the toe.
Crimple’s instep will be graced with a ribbed lace. At first glance the chart may look daunting, but once you start the pattern you will quickly get into its rhythm and find it simple yet interesting – my favorite kind of stitch pattern! If you are new to charts, circular charts are read from bottom to top (beginning with Row 1) and from right to left. My Charts Video will give you a quick tutorial. Please note that the first 5 minutes of the video are devoted to charts for flat knitting and charts for circular knitting (as used here) begin at the 6:00 mark. When I am knitting from a chart I find it helpful to use either highlighter tape or a sticky note (pictured below) to keep me on track.

I prefer to knit from a chart with a large font. Because of space constraints, most publications are forced to reduce the size of their charts making them difficult to read. I routinely enlarge these small-sized charts for my own use. Lucky for you that I created large, individual charts for each size of Crimple. In an effort to reduce the number of pages to print, each size has its own printable copy to download. This one page version contains only the basic information and is perfect to tuck into your knitting bag. The abbreviations and related videos are listed here online. I hope you will enjoy using less paper. Rest assured that at the conclusion of the KAL, a condensed and traditional version of Crimple will be available with all sizes and charts in one download.
The chart will be worked over the first half of the stitches – flowing up from the ribbed side of the toe. The sole, second half of the stitches, will remain in stockinette (all knit). Work the chart up the instep until the foot is 2″ less than the desired length ending after any even numbered row (no need to finish a chart repeat). To measure the stopping point, simply try on your sock and stop when the sock is 2″ shy from the back of your heel. (If you are knitting for someone else, ask for the length of their foot and subtract 2″.) It is at this point that we will begin the heel in next week’s clue.
Lace knitting is created with yarn over increases that are paired with decreases. Yarn overs form the hallmark holes in lace and the decreases restore the stitch count. Yarn overs can cause plenty of confusion for knitters. This simple little increase can be executed in several ways.
- Western-style knitters (working yarn held in right hand) create a yarn over in two different ways. When the stitch following the yarn over is a knit stitch, bring the working yarn between the needle tips to the front of the work and the yarn over is formed as the next stitch is knit. If the stitch following the yarn over is a purl stitch, the working yarn must be wrapped over the right hand needle. See Yarn Over Video to review these techniques.
- Continental-style knitters (working yarn held in left hand) create a yarn over by scooping up the working yarn with the right hand needle. A yarn over is made is this manner every time with no regard to the stitch following the yarn over. See Yarn Over (Continental) Video
The decreases used in Crimple are the K2tog and SSK. These essential decreases are the most common decreases in lace knitting.
Lifelines are incredibly helpful in lace knitting. This strand of waste yarn threaded through your knitting will safeguard the stitches below it and protect your hard work. I never knit lace without them! Watch my Lifelines Video to place a safety net in your sock.
Lastly, those knitting size Small and Large will notice that their charted instep begins with a purl stitch. These knitters must remember to begin the instep with the yarn in the purl position to prevent an unwanted yarn over. Magic Loop knitters will need to be especially vigilant that the working yarn is in the front of the work and under the right hand needle to execute the first purl stitch.
Enjoy the Foot design and I look forward to following your progress. Happy knitting!

k2tog – knit two together. See K2tog Video
ssk – slip next stitch as if to knit, slip next stitch as if to knit, insert left needle into the front of these two slipped stitches from left to right and knit together. See SSK Video
yo – yarn over. See Yarn Over Video

Small – Click here to download printable version
Medium – Click here to download printable version
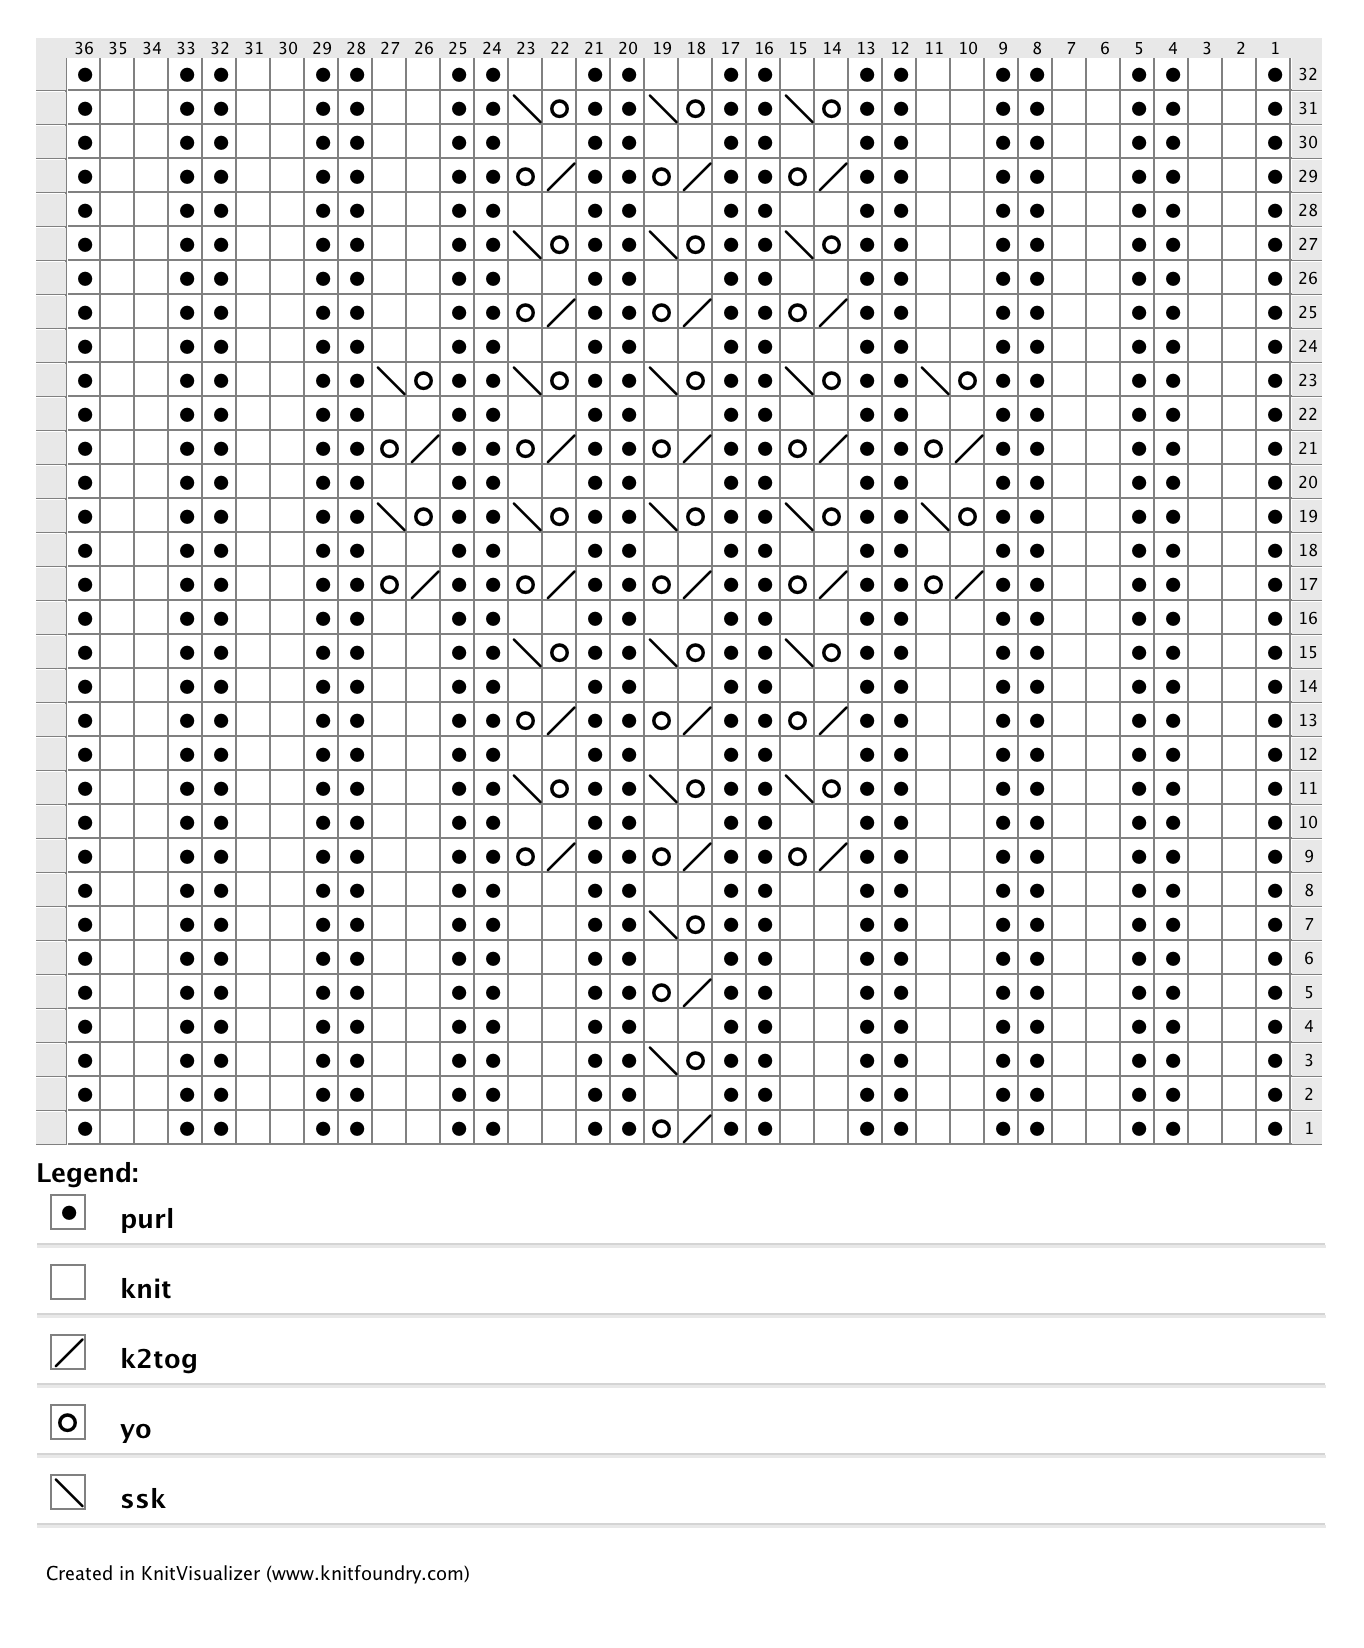
Large – Click here to download printable version
Foot
Work charted design in appropriate size over instep stitches maintaining sole in stockinette (all knit). Continue knitting in pattern until foot measures 2” less than desired length ending after an even numbered row.
Small Size Chart
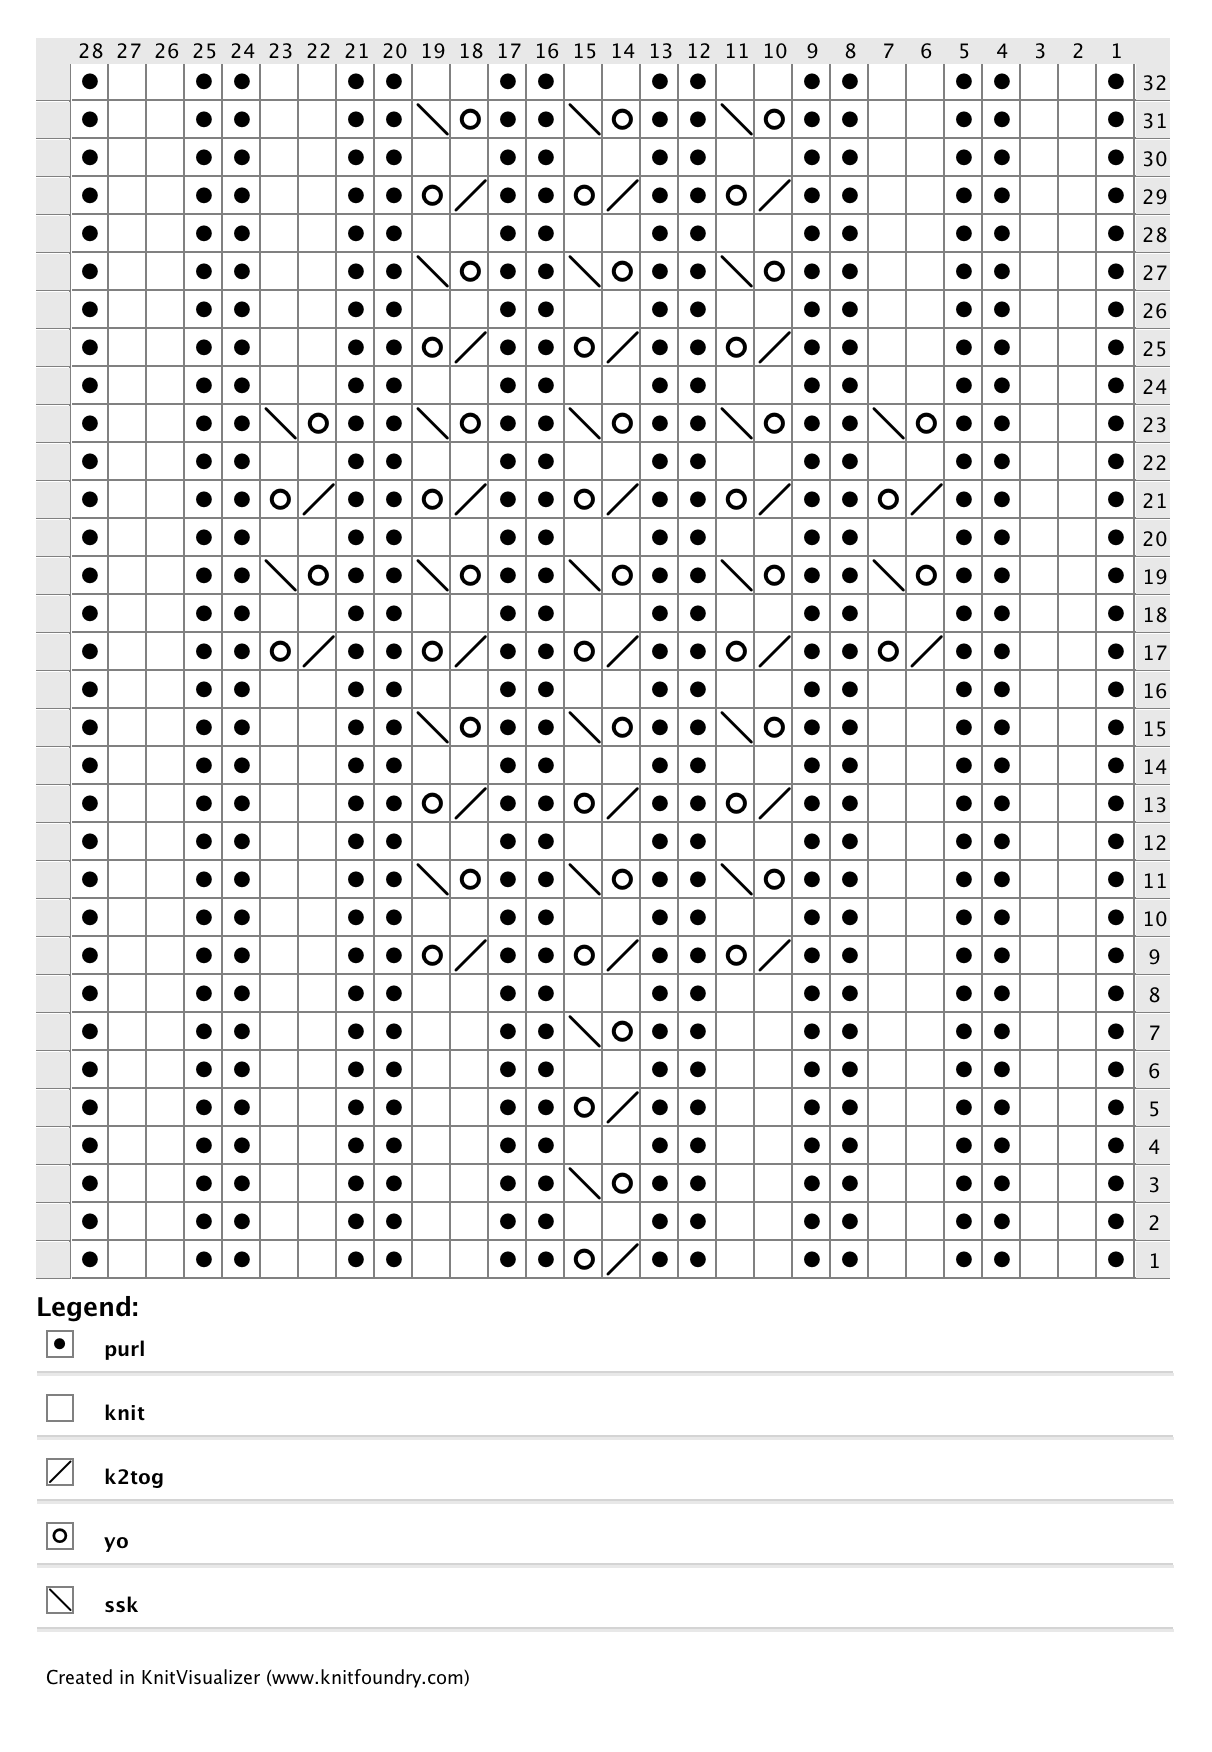
Medium Size Chart

Large Size Chart