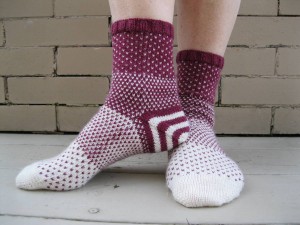
Disappearing Act – Revealed!

I hope you enjoyed the introduction to color work and two handed knitting in Disappearing Act!

The Progressive Needles Knit Along will be on a short hiatus.  Subscribe to my newsletter to receive updates on the upcoming NEW projects for the series.  The knitting education continues with more patterns, techniques, yarns, videos and FUN!

Not sure what to knit while you are waiting?  Continue to grow your knitting skills with my new book, Building Blocks.  This skill building series is a carefully designed sequence that covers the major knitting principles as you knit 12 lovely squares.  Each square, or block, builds upon the skills of the previous square as you knit your way to a gorgeous sampler afghan.  All of the skills are supported with the video lessons you have come to rely on from Knit Purl Hunter.


Look for Building Blocks at your Local Yarn Shop or click on the following logos to shop now!

Disappearing Act – Part 4

Our beautiful color work sock is complete and now we are ready for the Afterthought Heel!  Watch “Afterthought Heel – Part 2 and Part 3” Videos to finish these delightful socks.  Part 2 will assist you in picking up the heel stitches and removing the waste yarn.  Part 3 demonstrates picking up stitches to close the gaps and the decrease round.

Disappearing Act has the added bonus of a striped Afterthought Heel.  A striped heel makes the most out of the remaining yarn yardage while giving our socks a whimsical touch.  The striped heel also provides an opportunity to study knitting stripes in the round.

Many of us think of rounds of circular knitting as being like a stack of disks piled one on top of the other.  Actually, rounds of knitting form a continuous spiral.  Because of the spiral effect, pattern changes (such as stripes) create an interruption to the design at the beginning of the round.  These “jogs” disrupt the smooth lines of stripes.  Disappearing Act’s heel uses a neat little trick to soften this jog and give the stripes a seamless look.  Watch my Jogless Stripes” Video to learn how to minimize this pattern interruption.  This technique is wonderful to use in any striped circular knitting project.

Tune in tomorrow for a photo of the completed socks.

Part Four

Click here to download printable version

JS (Jogless Stripe) – slip as if to purl the 1st stitch of previous color (one round below) and bring leg up to left needle.  Knit both colors together.   See “Jogless Stripes” Video

k2tog – knit two together.  See “k2tog” Video

ssk – slip next stitch as if to knit, slip next stitch as if to knit, insert left needle into the front of these two slipped stitches from left to right and knit together.  See “ssk” Video

Afterthought Heel

Note:  Heel may be worked using double points, two circs or magic loop method.

See “Afterthought Heel – Part 2” Video

With toe pointed downward and using a double point or circular needle, pick up the right leg of each stitch below the waste yarn. There will be 32(36,40) stitches on this needle.

With toe pointed upward, pick up the right leg of each stitch below the waste yarn using a second double point or the circular needle after it has been pulled through the lower stitches.  There will be 32(36,40) stitches on the second needle.

Carefully remove waste yarn to create opening for heel.

First 32(36,40) stitches picked up will be the “lower stitches”.  Second 32(36,40) stitches will be the “upper stitches”.  If using double points, divide the stitches evenly onto four needles.

See “Afterthought Heel – Part 3” Video

Work the following rounds to form striped heel.  Each round is for all sizes unless indicated.  The Decrease Round found in Round 2 is worked the same in all of the following decrease rounds.

1.  Begin round by joining Color B to first stitch of lower stitches.  Knit 32(36,40).  Pick up and knit 2 stitches in gap (“ditch”) between lower and upper stitches.  Knit 32(36,40).  Pick up and knit 2 stitches in gap (“ditch”) between upper and lower stitches.  Total of 68(76,84) stitches.

2.  With Color B, work Decrease Round:

On lower stitches: k1, ssk, knit to last 3 lower stitches, k2tog, k1.

On upper stitches: k1, ssk, knit to last 3 upper stitches, k2tog, k1.  64(72,80) stitches.

3.  With Color B – Decrease Round.  60(68,76) stitches.

4.  With Color B – Sizes Small and Medium: knit.

Size Large: Decrease Round.  72 stitches.

5.  With Color A – Decrease Round.  56(64,68) stitches.

6.  With Color A – JS, knit to end of round.

7.  With Color A – Decrease Round.  52(60,64) stitches.

8.  With Color A – Knit.

9.  With Color B – Decrease Round.  48(56,60) stitches.

10.  With Color B – JS, knit to end of round.

11.  With Color B – Decrease Round.  44(52, 56) stitches.

12.  With Color B – Knit.

13.  With Color A – Decrease Round.  40(48,52) stitches.

14.  With Color A – JS, knit to end of round.

15.  With Color A – Decrease Round.  36(44,48) stitches.

16.  With Color A – Knit.

17.  With Color B – Decrease Round.  32(40,44) stitches.

18.  With Color B – JS, knit to end of round.

19.  With Color B – Decrease Round.  28(36,40) stitches.

20.  With Color B – Knit.

21.  With Color A – Decrease Round.  24(32,36) stitches.

22.  With Color A – JS, knit to end of round.

23.  With Color A – Decrease Round.  20(28,32) stitches.  Size Small only:  cut yarn leaving an 18” tail.  Close opening using Kitchener Stitch.

24.  With Color A – Sizes Medium and Large: Knit

25.  With Color A – Sizes Medium and Large: Decrease Round.  (24,28) stitches.  Cut yarn leaving an 18” tail.  Close opening using Kitchener Stitch.  See “Kitchener Stitch” Video

Knitting socks is a lot like childbirth.

Once you see how beautiful they are

You forget all about the labor!

©2012 Michelle Hunter

www.knitpurlhunter.com

Coming Soon!

Progressive Needles Knit Along continues…

Subscribe to my newsletter to receive updates about the projects, yarns, dates and more.

Disappearing Act – Part 3

I trust you are gaining speed and ease in two-color/two-handed knitting with the completion of Part Two.  Part Three concludes the sock all except for the Afterthought Heel.

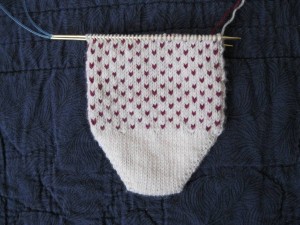
Some of you have placed the waste yarn for the heel in Section II of the design.  Today’s clue reveals Section III and IV allowing everyone to finish the foot and leg while knitting the waste yarn in its proper location for the anticipated heel.  As a reminder, the waste yarn should be placed 2 ¼” from the end of the foot.  It is very important to place the waste yarn at the conclusion of an odd numbered round so that the stitches above the waste yarn will be in a solid color.  I have included the instructions for the waste yarn placement again in this post for your convenience.

Enjoy the pattern as the main color disappears into the contrasting color!

Part Three

Click here to download printable version

Foot/Leg

IMPORTANT:  Continue to work Foot, maintaining two-color design (below), until it measures 2 ¼” less than desired length ending after an odd numbered round.

Place waste yarn for Afterthought Heel as follows:

K32(36,40) with waste yarn.  Return these stitches to the left hand needle.  Continue knitting in established design pattern beginning with an even numbered row.  See “Afterthought Heel – Part 1” Video

After inserting the waste yarn, the remaining rounds will form the leg.

Section III – Work these 4 rounds 8(7,6) times.

Round 1.  *1A, 1B; repeat from * to end of round.

Round 2.  Knit B.

Round 3.  *1B, 1A; repeat from * to end of round.

Round 4.  Knit B.

Section IV – Work these 4 rounds 8(7,6) times.

Round 1.  *3B, 1A; repeat from * to end of round.

Round 2.  Knit B.

Round 3.  1B, 1A, *3B, 1A; repeat from * to last 2 stitches, 2B.

Round 4.  Knit B.

Cuff

Using Color B, decrease as follows:  *K6(7,8) k2tog; repeat from * to end.  56(64,72) stitches.

Continuing with Color B, work a k2, p2 rib for 8 rounds.

Bind off using Sewn Bind Off Method.  See “Sewn Bind Off” Video

STOP!

Next week’s final clue brings the Afterthought Heel. Because I will be traveling to Stitches West next week,  the last clue will be released on Wednesday, February 22.   Happy knitting!

Disappearing Act – Part 2

Our toe is complete and Section I of the design has been revealed.  Whether you are knitting with one hand or two, I hope you are enjoying the introduction to color work.

This week’s clue not only brings you Section II of the design, but another surprise as well.  Disappearing Act will include an Afterthought Heel!  Although we will not get to the actual heel construction until the sock is complete (hence the name), we need to set the stage for its placement.

In our pattern, the Afterthought Heel will be placed 2 ¼” from the end of the foot.  One strategy to find this location is to place the sock on the foot and stop knitting when the sock is 2 ¼” from the back of the heel.  (A great reason to knit with circular needles.)  Another option is to measure the entire length of the foot, from tip of toe to back of heel, and subtract 2 ¼” from this number.  (This works for double point knitters.)

Once the location of the heel is identified, a piece of waste yarn is knit into the sock.  This waste yarn should be in a contrasting color for easy viewing.  The waste yarn should be smooth for easy removal later.  A yarn with fuzzy fibers is difficult to separate from the work.

It is VERY important to place the waste yarn after completing an odd numbered round.  This allows for a round of solid color knitting, an even numbered round, to follow the placement of the waste yarn.  A solid row above the Afterthought Heel is more stable and lends itself to a tidy transition when the waste yarn is later removed.  The curious aspect of the heel is that the color work below the waste yarn has no bearing on the appearance of the heel stitches.

If you are lucky enough to have a petite foot, you may be placing the waste yarn for the heel somewhere in Section II.  I knit the Medium Size for my size 8 foot.  My waste yarn was placed in Section III.  If you are like me, you will have to wait until next week’s clue to place the waste yarn at the correct location.  Whenever you are ready for the waste yarn, watch the Afterthought Heel – Part 1” Video to guide you through this step.

As you move past the waste yarn, the remainder of the sock will form the leg.  Take the time to check the fit at this point.  If you would like a wider leg, go up one needle size at this juncture to gain a bigger leg circumference.  Changing needle sizes at this point will be nearly invisible to the eye.

Part Two

Click here to download printable version

IMPORTANT:  Work Foot, maintaining two-color design, until it measures 2 ¼” less than desired length ending after an odd numbered round.  For most knitters this placement may occur in Section II (below) or Section III (next week’s clue).

Place waste yarn for Afterthought Heel as follows:

K32(36,40) with waste yarn.  Return these stitches to the left hand needle.  Continue knitting in established design pattern beginning with an even numbered row.  See “Afterthought Heel – Part 1” Video

Section II – Work these 4 rounds 8(7,6) times.

Round 1.  *1A, 1B; repeat from * to end of round.

Round 2.  Knit A.

Round 3.  *1B, 1A; repeat from * to end of round.

Round 4.  Knit A.

STOP!

Next’s week’s clue finishes the design.  Happy knitting!

Disappearing Act – Part 1

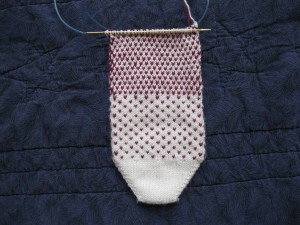
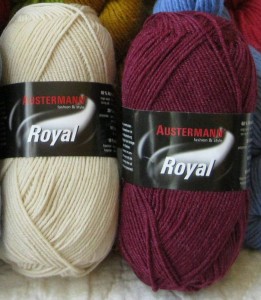
Welcome back to sock knitting with the Progressive Needles KAL!  This month’s project brings us two-color knitting in a toe up sock using the lovely hues of Royal by Austermann.  I am a huge fan of color work and after knitting this pattern you will be, too!

Disappearing Act begins with simple toe up construction.  If you are new to toe up socks, watch my #1 video, Judy’s Magic Cast On. Before starting, you will need to decide which color to designate as Color A – the toe color.  There is NO right or wrong choice.  For my sample, I chose the light color as Color A and the dark color as Color B.  My dozens of test knitters chose a multitude of color combinations and they were all equally fabulous.

Upon completion of the toe, this week’s clue continues with the beginning of the color work pattern.  Disappearing Act is a stranded knitting color pattern.  Stranded knitting, often referred to as Fair-Isle knitting, is a technique generally worked in stockinette with no more than two colors in a row.  I have created a clever yet simple pattern to introduce you to the wide range of design possibilities.

Disappearing Act is available in three sizes – Small, Medium and Large.  Stranded knitting requires more yarn than single color stockinette.  This pattern allows for an interesting play of color well within the yardage limit of two 50 gram skeins.  The finished length of the sock, measured from the tip of the toe and up the front of the foot/leg to the cuff, is determined by the number of stitches in each round. (See Size info below.)  A Small sock has fewer stitches per round allowing for more repeats of the design within the yardage.  A Large sock has more stitches per round allowing for less repeats of the design within the yardage.  I wanted to provide you with a pattern that introduced you to stranded knitting while using a frugal amount of yarn.  If you prefer a longer sock, more yardage will be needed.

Stranded knitting is executed with the yarns held in one hand or two.  For One-Handed stranding, knit with one color to the color change.  Drop the working yarn and bring the new color over the top of the dropped yarn.  Continue knitting to the next color change and repeat the process.

Like traditional European knitters, I prefer to work stranded knitting with the Two-Handed method.  This method combines the Continental and Western styles of knitting.  The left hand holds one color of yarn to be “picked” while the right hand throws the other color of yarn.  As a lifelong Western-style knitter (thrower), this was groundbreaking stuff!  I was pleasantly surprised how speedy I became at this combined method after just a few rounds.  Watch my Two Handed Two Color Knitting” Video to take your knitting to the next level.   I strongly encourage you to try this slick technique.

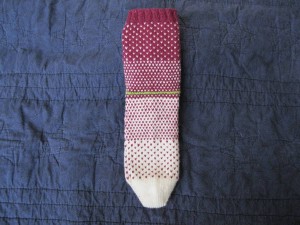
The challenge in stranded knitting is to maintain an even tension as you alternate between the two colors.  The strands across the wrong side of the fabric mustn’t be too tight or it will cause the fabric to pucker.  Conversely, if the strands are too loose it will leave large loops on the wrong side that may snag when wearing.  An even tension leaves the strands on the wrong side (as seen below) laying gently over the stitches providing an extra layer of warmth.  A bit of practice will have your tension even and smooth.
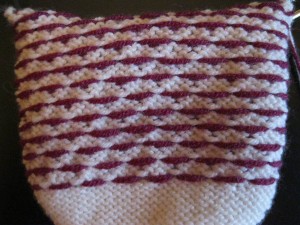
Stranded knitting leaves a firm fabric with little stretch.  To accommodate this characteristic, the stitch count is increased after the toe prior to the color work.  I highly recommend inserting a Lifeline after the toe.  Upon completion of Section I, measure the width of your sock and evaluate its size compared to your foot.  Should you need to change the size or adjust the needles, it becomes quite easy to take your work back to the lifeline at the toe.  See my Lifelines” Video to learn this essential knitting skill.

Lastly, changing needles sizes is very common among stranded knitters AND sock knitters.  One size may work for the toe and/or foot while a larger size may give the needed room for the leg.  Experiment, measure and implement a lifeline for a successful fit!

Part One

Click here to download printable version

One skein Royal by Austermann, 50g / 219 yards, (Color A)

One skein Royal by Austermann, 50g / 219 yards, in a contrasting color (Color B)

US#1 (2.5mm) needles or size necessary to achieve desired gauge.  Pattern may be knit with double points, two circular knitting method or magic loop.  See “Magic Loop” Video

8.5 stitches = 1 inch in stockinette.

Women’s Small, Medium and Large.  Additional size adjustments may be made by altering needle sizes.

Small leg circumference measures approximately 7” unstretched and stretches comfortably to 10”. Finished length measured along top of foot from toe to cuff is 13½”.

Medium leg circumference measures approximately 7¾” unstretched and stretches comfortably to 11”.  Finished length measured along top of foot from toe to cuff is 12½”.

Large leg circumference measures approximately 8½” unstretched and stretches comfortably to 12½”. Finished length measured along top of foot from toe to cuff is 11½”.

A – Color A

B – Color B (contrasting color)

kfb – knit into front and back of stitch.  See “kfb” Video

Note:   Directions are for Small Size (Medium, Large Size in parentheses when necessary).  When knitting from patterns with multiple sizes, use a highlighter to mark the numbers that pertain to your size.

TOE

Cast On – See “Judy’s Magic Cast On” Video

With Color A and using two needles, cast on 20(24,24) stitches using Judy’s Magic Cast On with 10(12,12) stitches on each needle.

Securing tail, knit first 10(12,12) stitches.

Knit second 10(12,12) stitches through the back loop.

Toe Increases

If using one or two circular needle knitting method, increases (kfb) are made at the beginning and end of each needle as follows:

Round 1.  On 1st needle, kfb, knit to last stitch on needle, kfb;

On 2nd needle, kfb, knit to last stitch on needle, kfb.

Round 2.  Knit all stitches.


If using double points, arrange stitches evenly with 5(6,6) stitches on 4 needles.  Increases (kfb) are made as follows:

Round 1.  Kfb, knit to last stitch on 2nd needle, kfb, kfb into 1st stitch on 3rd needle, knit to last stitch on 4th needle, kfb.

Round 2.  Knit all stitches.


All needle types:  Repeat Rounds 1 and 2 until toe reaches 56(64,72) stitches.

*I recommend placing a lifeline after the toe to allow for easy changes in size if needed.  See “Lifelines” Video


FOOT

Increase 8 stitches evenly in next round as follows:  *K6(7,8), kfb; repeat from * to end of round.  64(72,80) stitches

Knit remainder of sock following Two-Color Pattern beginning with Section I, found below.  Work this section the recommended number of repeats.

ALL stitches are worked in the knit stitch.  See “Two Handed Two Color Knitting” Video


Two-Color Pattern

Section I  – Work these 4 rounds 8(7,6) times.  A total of 32(28,24) rounds.

Round 1.  *3A, 1B; repeat from * to end of round.

Round 2.  Knit A.

Round 3.  1A, 1B, *3A, 1B; repeat from * to last 2 stitches, 2A.

Round 4.  Knit A.


STOP!

Take the time to ensure that the sock provides a good fit.  If needed, take knitting back to the lifeline and reknit making a different size or changing needle sizes.

Happy knitting!