
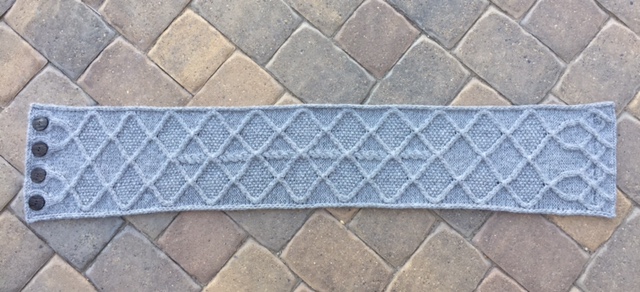
We finish Behind The Scenes with the true inspiration of the piece – the buttonholes! While combing through my stack of stitch dictionaries, I came across a fascinating cable design called Tudor Grillwork in A Second Treasury of Knitting Patterns by Barbara Walker. I decided that the diamond-shaped cables would make a lovely home for a buttonhole. After some modifications and much swatching, the cable finale was complete. I am so excited to share it with you!

Section E sets the stage for the cables creating four “arms” leading into the diamonds. Because the upcoming diamond cables draw in the fabric, eight increases are worked in Row 10 to bring the stitch count to 54 stitches. The increases are worked on the wrong side of the fabric into each “arm”. To maintain the arm’s established stockinette, the increases are worked as a Purl Front and Back or pfb. To execute a pfb, purl into the front leg of the stitch as usual leaving the original stitch on the left hand needle. Next, bring the right hand needle behind the back leg of the stitch on the left needle and past it. Enter the back leg of this stitch from left to right and purl it, removing the original stitch from the left needle. An up-close tutorial of this tricky little guy is waiting for you in my Pfb video.
The cables in Section F are all old friends by now. The buttonholes make their appearance in Row 7 nestled inside the diamond-shaped cable. A firm and tidy buttonhole is a must in any project. My same-row method yields superior results and is simple to work. Watch the Buttonhole video to master this essential skill.
Upon completion of the cables, p2tog decreases are worked in Row 14 to restore the stitch count to the original 46 stitches. If working from the chart, the No Stitch symbol returns as a placeholder for the decreased stitches.
Section F’s Row 16 seems a bit odd with the center stitches worked in all purl on the wrong side. This is not a mistake! We are working a short purled garter ridge to stabilize the reverse stockinette below. Trust the pattern:)
Lastly, bind off the stitches in pattern to maintain the I-cord edging all the way through the bind off. To bind off in pattern, knit 2, bind off one, *purl one, bind off one; repeat from the * until two stitches remain on the left needle, knit one, bind off one, knit one, bind off one. Cut yarn and pull through the last stitch.
I chose to block my cowl to open up the cables and create uniform edges. For this piece, I used blocking wires and a spray bottle to block. Blocking wires are threaded through the I-cord edge on each side of the dry piece. Once the wires are in place, stretch the piece to the desired dimensions and secure into place with a few pins along the inner edge of the wire to stabilize it to the blocking surface. The blocking surface can be foam squares, carpet, a bedspread or towels. Using a bottle filled with plain water, thoroughly saturate the piece. Adjust the original pins if needed. Allow the yarn to completely dry before removing the wires – this usually takes 24 hours or more.
Sew the buttons to the cast on edge of the piece inside of the “horseshoe” cables. The buttons may be attached with either sewing thread or yarn. Thread is stronger which is why I usually prefer to use it for its durability. However, if I am using a button with large holes as seen below, I will attached them with yarn. Thread the yarn onto a tapestry needle. Hold the button in place and enter one of the holes from the wrong side of the fabric leaving a short tail. Enter the second (or subsequent) hole from the right side to the wrong side. Repeat this step. Tie the starting tail together with the end tail into a knot. I like to secure the knot with Fray-Check (available at craft/sewing stores), an invisible solution that will prevent the knot from opening and the yarn from fraying.
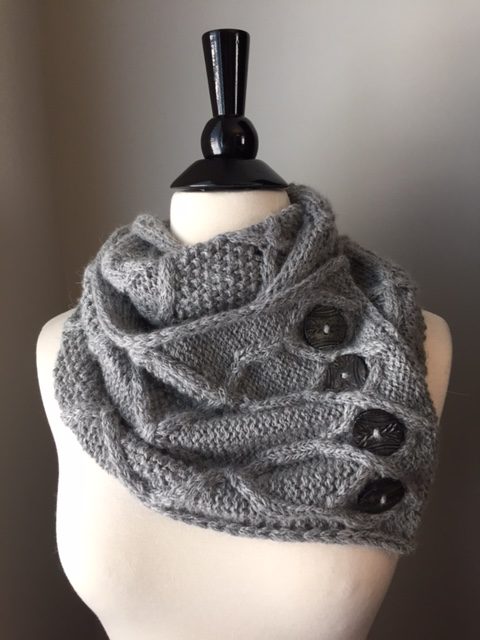
Time to button up the cowl and marvel at your work!

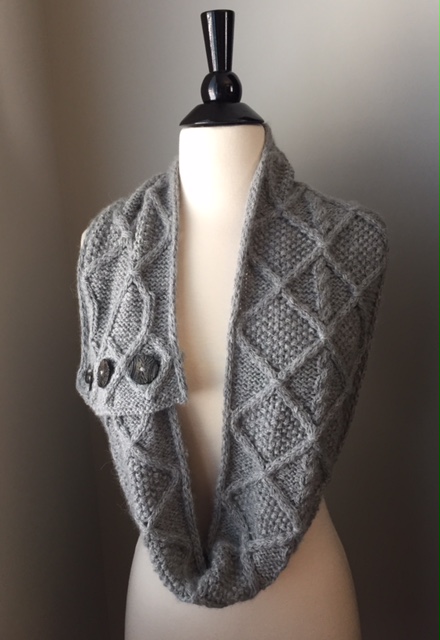
Once buttoned, the cowl can be worn doubled to ward off the chilliest of weather or left singly draped for all to admire.
Remember, this pattern is FREE until November 30th. After this date, the pattern will be available as a purchase on Ravelry. The helpful introductions to each section will remain on my website indefinitely but the pattern will go away. Be sure to download the pattern by November 30! As a reward for your loyal participation, here is the complete design in a condensed pattern.
I loved hearing from you all and hope you had fun while learning a bit along the way. I look forward to knitting with you again in April of next year (see below).
Happy knitting,
Michelle
April 2018 KAL – Transient
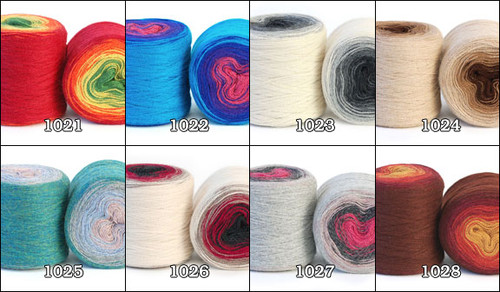
My next knit along will be a shawl knit with the beautiful new yarn, Concentric. Named after the concentric circles that this cake of yarn so closely resembles, these color gradients were carefully designed by the Skacel color specialists! Concentric is made from four non-plied strands, which create the distinctive color change. The colors change at a regulated sequence allowing for a wide range of design possibilities.
In Transient, each color change will bring a different stitch pattern in this easy to wear shawl. You will find yourself racing to the next color change to find out what comes next!
Pictured below is a prototype of the shawl. This garter stitch example is in the exact shape of the Transient shawl and knit in color #1022 Rainbow’s End. Imagine how much prettier the real version will be with multiple stitch patterns inserted at the thirteen color changes.
Concentric is made of 100% baby alpaca with each cake containing 220g/437 yds. One skein is all that is needed for the shawl. I knit mine on addi US #8 32″ needles. I will have gauge information and further details for you early next year. Be sure to subscribe to my newsletter for all of the updates.
![]()