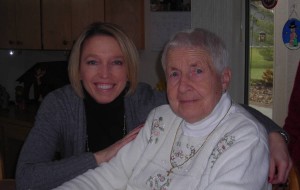
My grandmother, Ann Davalla, taught me to knit as a young girl. I can still see her care worn hands guiding me through the stitches. I learned many things from Grandma over the years, but one of her favorite sayings about knitting has stuck with me.
It happened when I became very frustrated after finding a mistake deep in my knitting. Grandma calmly looked at the mistake and said, “If it is perfect, it was made on a machine.”
How liberating that phrase was to me! Grandma gave me permission to be human and a reason to accept my mistake. I think this knitting lesson could apply to life in general. So be human and knit on!
Category: Tips
Count your Stitches!
You’ve heard of the carpenter’s mantra, “Measure twice, cut once.” Knitters should count their stitches twice, knit once. It is painful to get to the end of a 187 stitch set up row and find out you only cast on 186 stitches!
Heel Workshop
HEEL WORKSHOP
Traditional Heel
The secret to a successful traditional heel lies in the heel flap. The heel flap selvages provide the foundation for future gusset stitches. Choose one of the following heel flap patterns to lay the perfect foundation for picking up your gusset stitches.
After completing final round of leg, turn to wrong side of stitches just worked to begin heel flap. Heel flap is generally knit over half the total number of leg stitches. In each option, repeat the two rows over an even number of stitches until heel flap reaches desired length ending after row 1.
#1 Slip Stitch Chain Selvage
The first stitch of each row is slipped. Selvage is loose and chain edge makes it simple to pick up gusset stitches.
1. (WS) Slip 1 purlwise with yarn if front, purl to end.
2. (RS) *Slip 1 purlwise with yarn in back, k1; repeat from * to end of row.
#2 Wrapped Slip Stitch Selvage
The last stitch of each row is slipped and then immediately knit on next row. Selvage is a bit firmer than Option #1, but still maintains a chain edge.
1. (WS) K1, purl to last stitch, slip 1 purlwise with yarn in front.
2. (RS) *K1, slip 1 purlwise with yarn in back; repeat from * to last 2 stitches, k1, slip 1 purlwise with yarn if front.
#3 Single Garter Stitch Selvage
First and last stitch of each row is knit. Selvage is tight with no chain edge. Stitches may be picked up in bumps or bars along edge.
1. (WS) K1, purl to last stitch, k1.
2. (RS) *K1, slip 1 purlwise with yarn in back to last 2 stitches, k2.
©2010 Michelle Hunter
www.knitpurlhunter.com
Rescuing Twisted Stitches
At some point, all knitters are faced with ripping out their knitting. Sometimes your mistake is so far down that it is easier to rip back to the error and then replace the stitches back onto the needles. When we place these stitches back on the needles it is very common to twist the stitches by sitting them on the needles incorrectly. (This also happens to me when I accidentally drop a stitch and pick it up in a frenzied panic before it runs down!)
When looking at the two “legs” of a knit stitch, the left leg of the stitch should be behind the needle with right leg in front. If you put your stitches with the right leg in front, essentially twisted, then I have a great tip for you. To untwist your stitches, simply knit into the back loop of the twisted stitch and VOILA! Your stitch is now sitting on the right hand needle in the correct position with the left leg behind the needle and no twist.
If you are like me, you are wondering where was this tip when you untwisted 97 stitches before knitting them!
Tail Tip
Tie the tail from your cast on stitches in a bow. Should you grab the tail instead of the working yarn, you will be stopped quickly by the bow and only need to unknit a few stitches. Every knitter, no matter their skill level, knits with the tail now and then. UGH!
The Bewitching Hour Rule
If you make a mistake in your knitting late in the evening, resist the urge to rip it out. Put it aside until tomorrow. Chances are the mistake won’t look as daunting in the morning when your eyes are sharper and you are rested. 11pm is my bewitching hour and I never rip out after that time. If you want to keep knitting after your bewitching hour, grab an easy project and knit til the wee hours!
The Scale Can Be Your Friend (Dividing a Skein of Yarn)
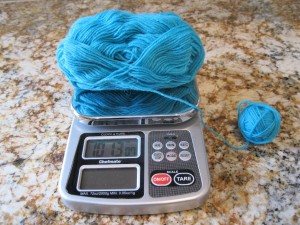
I have found that the best use of a food scale is to weigh your yarn. (My friend the Weight Watchers instructor hates when I say this!) I purchased a digital food scale that displays both ounces and grams. They can be found at many large retail stores (Target, Walmart, etc.) and are fairly inexpensive.
When making socks out of a 100g skein, I place the yarn on the scale and keep winding a ball off of the skein until the scale shows 50g. Voila! I now have two 50g balls of yarn allowing me to knit two socks at one time without having to use both ends of the skein. (This can get a bit tangled and I don’t like anything to slow me down.)
I also use the scale to weigh completed socks to help me determine if I have enough yarn remaining to knit the second sock. For example, you knit a sock for a long foot and you are unsure if you need to purchase more yarn – weigh the completed sock and compare it to the weight of the yarn left over. If the completed sock weighs less than the weight of the remaining yarn then you will not need to purchase more yarn.
If you want to knit two socks at a time with a questionably short yardage amount – use the scale to divide the yarn evenly and knit two toe up socks until the yarn is gone.
I have been midway through a sweater project and not sure if I have enough yarn left to knit the last sleeve. I will just weigh the finished sleeve and compare that to the amount of yarn I have left. This has saved me from being a little short on yarn and then scrambling to find the right dye lot.


