Welcome to the fall installment of the Progressive Needles Knit Along. I’m excited to get back to sock knitting with you, especially one with so many great techniques and new videos! As always, continued praise for our sponsor, Skacel Collection, whose support makes these KALs possible.
Before we begin, here is an overview of the KAL:
- A portion of the 4-part mystery pattern is revealed here on the 1st, 2nd, 3rd and 4th Thursdays in October at 9am Eastern time. The weekly pattern, video resources and lots of helpful tips are included in each post. An abbreviated, pattern-only version is included to download.
- All techniques are supported with video instruction at knitpurlhunter.com
- All questions and comments are monitored daily both here and in the Knit Purl Hunter group on Ravelry. It’s like having your own private knitting tutor!
- Projects completed (one sock) by November 15 are eligible for the monthly prize drawing – first prize is a set of addi Clicks! See skacelknitting.com for all the info.
When designing socks, sometimes the stitch pattern determines which yarn I will choose. At other times, it is the yarn that is driving the stitch selection. For Cableship, I knew that I wanted to design a sock using Zauberball yarn. The deeply intense, gradient yarn has long been a favorite of mine. I just knew I had to come up with a pattern that would do justice to this lovely yarn. The answer? Cables! No matter which shade of Zauberball you chose, it will showcase the strong cable design. As the colors flow, so will your stately cables!
Zauberball is a single ply yarn with a different “feel” than other plied yarns. I firmly believe that every knitter and yarn have a get-acquainted period before reaching the zen moment when the stitches and yarn start to fly. Every worthy yarn deserves a courtship, so enjoy getting to know this colorful beauty. Because of the long color runs in Zauberball it is likely that you will not have identically striped socks. I embrace this departure from the ordinary!
The pattern is written for one at a time sock knitting. If you are a die hard two at a time knitter, wind off half of the skein into a second ball. If you want the yarns to stripe in the same color sequence, the second ball of yarn must be rewound to run in the same direction as the original skein.
Gauge is very important when knitting any sock. I have knit hundreds of socks and my experience tells me that a 64 stitch sock on #1 (2.5mm) needles is the formula for me so that is where I started. Oh, how I hate to be wrong! My first attempt at Cableship was with a #1 needle and too snug. I knit the same sock on #2 (2.75mm) needles and the sizing is now perfect for me. In the photo below, the blue sock on top was knit with #1’s and the lower green sock was knit with #2’s. It’s amazing the difference made by a quarter of a millimeter!
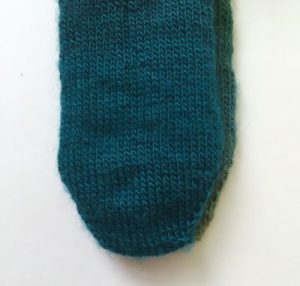
I share my experience with you as a caution to the veterans who will jump in with their usual size needle. Cableship is a bit firmer of a sock due to the cables, but it will also incorporate a rib based pattern to make it more forgiving. If you have a go-to needle size, you may want to use one size larger. For the diligent knitters who swatched, life is good and proceed with the needle determined by your gauge.
I think it is best to determine the size sock to knit by the circumference of your leg. Measure about 4″ inches above the ankle and use this measurement to determine the best size option for you. You can knit the foot to any length and the leg is knit to 6″ or shorter. The medium size is the dreaded average women’s sock:)
Cableship is a toe up sock that begins with Judy’s Magic Cast On (JMCO). My video is the most-watched tutorial of JMCO on Youtube. I feel a bit sheepish about this since my video equipment has vastly improved since its debut. This prompted me to film a new JMCO video in HD with clearer pictures and sound. It includes the same instructions plus a few extra tips. One of the tips is to work the toe increases using the make one stitch (which I use in Cableship) instead of a kfb. Watch my new version and let me know what you think!
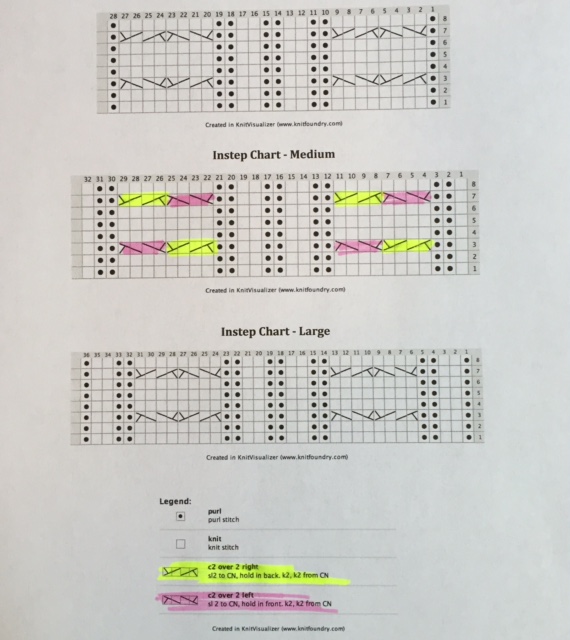
Once the toe is complete, begin the foot design over the first half of the stitches following the written or charted instructions. The foot design is fairly simple once established because you will always knit the knit stitches and purl the purl stitches in between the cables. It makes for fast knitting! Take care to knit from the correct size instructions. When using the charts, I like to color code the cable symbols for fast reading. Below is pictured my color coding for the medium size.
Continue knitting the cable design over the foot until it measure 2″ less than the desired length ending after Round 4. For example, if your actual foot is 9″ long then knit the sock to 7″. (The heel will add the extra 2″ needed.) If you are knitting with the magic loop or two circs, try the sock on your foot and assess the length from that vantage point.
Cableship’s foot is seen here below and ready for the heel. Did I mention that we will be knitting a heel new to the series? I can’t wait to share it with you!!!!
Happy knitting,
Michelle
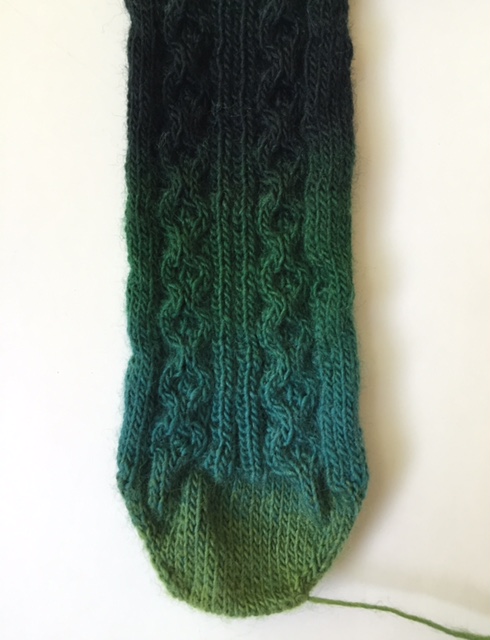
P.S. The “bunchy” toe will smooth out on your foot:)
Part One
Click here to download printable version

- Zauberball Socks, 75%wool/25%nylon, 100g/459 yards, 1 skein
- US #2 (2.75mm) or size necessary to achieve desired gauge. Pattern may be knit with double points, two circular or Magic Loop method. See Magic Loop Video
- Cable needle
- Two markers

8 stitches = 1 inch in stockinette

Women’s Small, Medium and Large.
Small – leg circumference measures approximately 5” unstretched and stretches comfortably to 10”.
Medium – leg circumference measures approximately 6” unstretched and stretches comfortably to 12”.
Large – leg circumference measures approximately 7” unstretched and stretches comfortably to 14”.
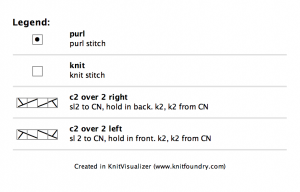
![]()
C4B (C2 over 2 Right) – slip next 2 stitches onto cable needle and hold in back of work, knit next 2 stitches from left hand needle, then knit 2 stitches from cable needle. See Cables Video
C4F (C2 over 2 Left) – slip next 2 stitches onto cable needle and hold in front of work, knit next 2 stitches from left hand needle, then knit 2 stitches from cable needle. See Cables Video
M1L (Make One Left) – With left needle tip, lift strand between needles from front to back. Knit the lifted strand through the back. See Make One Video
M1R (Make One Right) – With left needle tip, lift strand between needles from back to front. Knit the lifted strand through the front. See Make One Video

Directions are for Small (Medium, Large in parentheses when necessary).
Toe
Cast On – See Judy’s Magic Cast On Video
ALL Sizes
Using two needles, cast on 24 stitches using Judy’s Magic Cast On with 12 stitches on each needle.
Securing tail, knit all 24 stitches.
Toe Increases
If using one or two circular needle knitting method, increases are made at the beginning and end of each needle as follows:
Round 1. On 1st needle, k1, M1R, knit to last stitch on needle, M1L, k1.
On 2nd needle, k1, M1R, knit to last stitch on needle, M1L, k1.
Round 2. Knit all stitches.
If using double points, divide stitches evenly over 4 needles:
Round 1. K1, M1R, knit to last stitch on 2nd needle, M1L, k1. On 3rd needle, k1, M1R, knit to last stitch on 4th needle, M1L, k1.
Round 2. Knit all stitches.
All needle types: Repeat Rounds 1 and 2 until toe reaches 56 (64,72) stitches.
Foot
First 28(32, 36) stitches will form the instep (top of foot), with second 28(32, 36) stitches forming the sole.
Work appropriate size over instep stitches from written instructions (below) or from Instep Chart (following). Knit all sole stitches.
Continue knitting in pattern until foot measures 2” less than desired length of foot ending after Round 4.
(Example, if your actual foot measures 9” then knit sock to 7”.)
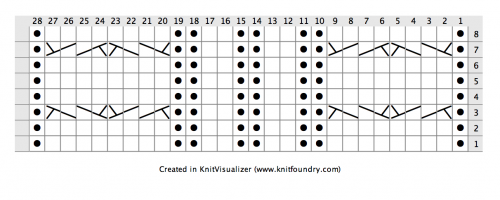
Instep – Small
Round 1. P1, k8, (p2, k2) twice, p2, k8, p1. Knit all sole sts.
Round 2. Same as Round 1.
Round 3. P1, C4B, C4F, (p2, k2) twice, p2, C4B, C4F, p1. Knit all sole sts.
Round 4. Same as Round 1.
Round 5. Same as Round 1.
Round 6. Same as Round 1.
Round 7. P1, C4F, C4B, (p2, k2) twice, p2, C4F, C4B, p1. Knit all sole sts.
Round 8. Same as Round 1.
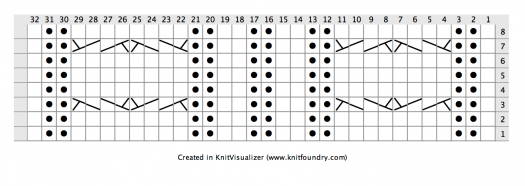
Instep – Medium
Round 1. K1, p2, k8, (p2, k2) twice, p2, k8, p2, k1. Knit all sole sts.
Round 2. Same as Round 1.
Round 3. K1, p2, C4B, C4F, (p2, k2) twice, p2, C4B, C4F, p2, k1. Knit all sole sts.
Round 4. Same as Round 1.
Round 5. Same as Round 1.
Round 6. Same as Round 1.
Round 7. K1, p2, C4F, C4B, (p2, k2) twice, p2, C4F, C4B, p2, k1.
Round 8. Same as Round 1.
Instep – Large
Round 1. P1, k2, p2, k8, (p2, k2) twice, p2, k8, p2, k2, p1. Knit all sole sts.
Round 2. Same as Round 1.
Round 3. P1, k2, p2, C4B, C4F, (p2, k2) twice, p2, C4B, C4F, p2, k2, p1. Knit all sole sts.
Round 4. Same as Round 1.
Round 5. Same as Round 1.
Round 6. Same as Round 1.
Round 7. P1, k2, p2, C4F, C4B, (p2, k2) twice, p2, C4F, C4B, p2, k2, p1. Knit all sole sts.
Round 8. Same as Round 1.
Instep Chart – Small
Instep Chart – Medium
Instep Chart – Large