
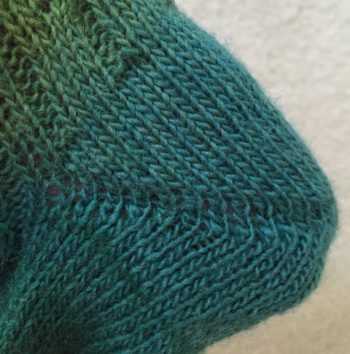
The lovely cabled foot is complete and a perfect showcase for the gradient stripes. I will bet that you have the pattern memorized and are itching for something new. Before proceeding, be sure that you ended the foot design after completing Round 4.
I am thrilled to bring the German Short Row Heel to Cableship. I adore this technique because there are no wraps to make or pick up. The absence of wraps makes the construction simple enough for even the most novice sock knitter. I also know that you will appreciate the heel’s nearly uninterrupted appearance.
Before beginning the heel, I HIGHLY recommend placing a lifeline through the stitches to safeguard the hard-earned foot design. I like to use thin cotton yarn or embroidery floss for my sock lifelines. See my Lifelines video for this essential knitting skill.
The magic in a German Short Row Heel is made possible by working a Double Stitch in place of the usual wrap & turns. To make a double stitch, with yarn in front, slip next stitch to right needle as if to purl. Next, pull the working yarn firmly to the back so that the slipped stitch is pulled over the top of the right needle with both legs visible on the needle making it appear as if it were two stitches. Return working yarn to knit or purl position for next heel stitch.
Just as you would expect, I have a comprehensive German Short Row Heel video to guide you through every step of the heel. I demonstrate the entire process, including double stitches and tips for success. Like me, this may be your new go-to heel!
A few words of advice before you begin the heel. The construction is simple, but like any new skill, it improves with practice. Consider making a small sock like mine in the video to practice on before moving to Cableship. Also, caution yourself to tug firmly on the working yarn but not TOO firmly. Remember that Zauberball is a single ply yarn and will not withstand Herculean pulls. Lastly, don’t forget to keep the Part 1 instructions handy as you will need to work a few more rounds of the instep design while constructing the heel.
For experienced two at a time sock knitters, the process is much the same as in any short row two at a time heel. For those new to both two at a time and short rows, please consider separating the socks and working the heels one at a time to makes things easier for you. The socks can be returned to one needle after the heel for two at a time knitting up the leg.
Speaking of the leg, I have an original cable design to debut next week that will lend a wow factor to the sock.
Happy knitting,
Michelle
Part Two
Click here to download printable version
![]()
DS (double stitch) – with yarn in front, slip next stitch to right needle as if to purl. Next, pull the working yarn firmly to the back so that the slipped stitch is pulled over the top of the right needle with both legs visible on the needle making it appear as if it were two stitches. Return working yarn to knit or purl position for next heel stitch. See German Short Row Heel video
PM – place marker

Directions are for Small (Medium, Large in parentheses when necessary).
Heel – See German Short Row Heel Video
Maintain established design pattern across 28 (32, 36) instep stitches.
The 28 (32, 36) sole stitches will form the heel.
I recommend placing a lifeline before beginning the heel. See Lifelines Video
Part 1
Work Round 5 of established pattern over instep stitches.
Over heel stitches, k9 (11, 12), PM, k10 (10, 12), PM, k9 (11, 12).
Turn to wrong side of heel stitches. (No longer working in the round.)
Row 1. With WS facing, make DS, purl to end of heel, turn.
Row 2. With RS facing, make DS, knit across heel to DS from previous row. Do not knit the DS. Turn.
Row 3. (WS) Make DS, purl to DS from previous row, turn.
Row 4. (RS) Make DS, knit to DS from previous row, turn.
Repeat Rows 3 and 4 until all of the stitches after the second marker are doubled and only one stitch remains undoubled before the first marker, ending after Row 3.
You will need to turn the work as usual after Row 3, make a DS on RS to complete all of the needed double stitches. The center stitches between the markers remain undoubled with working yarn attached to stitch that is right of the first marker.
At this point of the heel construction, with right side facing, the heel stitches are on the needles as seen in the photo below.
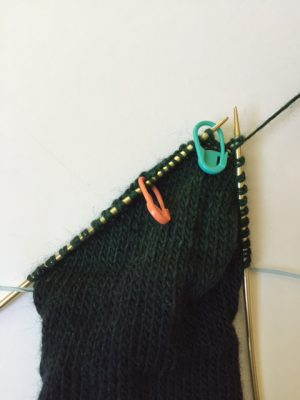
Reading above stitches from left to right:
On left hand needle – left side of heel, 2nd marker (orange), center stitches, 1st marker (green). On right hand needle – right side of heel.
Part 1 (cont.)
Slip 1st marker, knit across center stitches.
Slip 2nd marker, knit across stitches that are left of the center stitches, working each double stitch as if it were one stitch. (Insert right needle under both strands and work together as if a k2tog.)
Return to knitting in the round and work Round 6 of established pattern across instep stitches.
On heel, knit the double stitches that are right of the center stitches, working each double stitch as if it were one stitch.
Knit across remaining heel stitches, slipping markers. (Count the stitches – you should have 28 (32, 36) sts.
Work Round 7 of established pattern across instep stitches. (This is a cable round!)
Part 2
Row 1. With RS facing, knit heel stitches to second marker, slip marker, k1, turn.
Row 2. With WS facing, make DS, slip marker, purl across center heel stitches, slip marker, p1, turn. Markers may be removed now.
Row 3. (RS) Make DS, knit across heel to DS from previous row, knit the DS (treating it as one stitch as in Part 1), k1, turn.
Row 4. (WS) Make DS, purl across heel to DS from previous row, purl the DS (treating it as one stitch), p1, turn.
Repeat Rows 3 and 4 until the last stitch on right hand side of heel is purled ending after Row 4. Turn. One doubled stitch remains on left hand side of heel.
With RS facing, make DS, knit to DS at end of heel, knit the DS. Do NOT turn! One doubled stitch remains at beginning of heel (right hand side).
Return to knitting in the round. Work Round 8 of established pattern over instep stitches. Knit the last DS and knit across heel.
Heel is complete!