Ridgely – Part 4

KPHtemplate_header

ridgely7

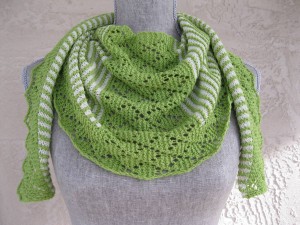
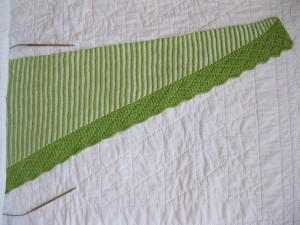
Our lovely Ridgely is complete and ready for finishing!  Part Four focuses on techniques that will enhance our shawlette and any knitted garment.

Blocking is the process of using steam or water on a knitted fabric and then pinning it into shape.  It gives knitting a smooth, professional finish.  Many yarns “bloom” or plump with blocking, allowing the stitches to become more uniform.  Blocking also presents the opportunity to adjust the fabric to the desired dimensions.  The results with lace fabric are especially dramatic as blocking opens the lace and creates better stitch definition.

I compare the blocking process to caring for a dress shirt.  A shirt that has been carefully laundered and pressed is far superior to an unwashed, rumpled shirt.  The extra time spent is very evident.  Your hours of careful knitting deserve the same proper treatment!

Prior to blocking, I recommend weaving the ends of your yarn into the wrong side of the fabric.  See Weave in Ends Video  As you weave in each strand, leave a 2″ tail at the end of each woven strand.  The yarn will stretch with blocking and some of this tail will be absorbed into the blocked fabric.  The excess tails can be trimmed after the blocking process.

Begin blocking by immersing the knitted piece in cool water, using a no-rinse soap if needed.  Allow the knitting to soak for about 15 minutes to absorb the water sufficiently.  Support the knitting as it is lifted out of the water and gently squeeze – never wring your knitting!  Next, roll the piece in a towel to remove the excess water.

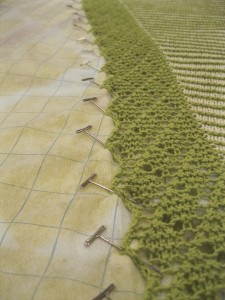
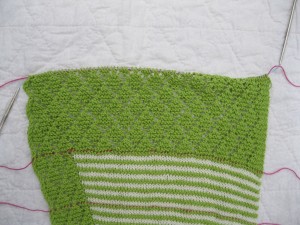
Lay the garment on top of a dry towel or blocking mat.  In the absence of a blocking mat, I use interfacing with 1″ grid lines (found at fabric stores) on top of the towel as a guide for straight lines and even sizing.  Using rust proof pins, pin the damp garment to the towel/mat.  In Ridgely, begin pinning along the edge of the Striped Body moving from the Center Panel to the tapered ends.  Take care to measure that both ends are stretched an equal distance from the center for symmetry.  Lastly, pin each point of the Lace Border to open the lovely lace.  (See below photo)  Allow knitting to dry fully before removing the pins.  See Blocking Video

ridgely8

Many experienced lace knitters have come to rely upon blocking wires to simplify the blocking process.  These thin wires are threaded through the edges of your knitting requiring fewer pins.  The wires are especially helpful in keeping edges straight and lace points uniform.   I demonstrate how to use them in my Blocking Wires Video.

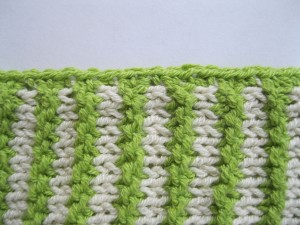
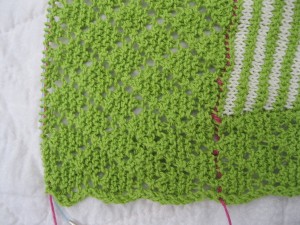
After blocking, some knitting may further benefit from an additional edge treatment.  A piece with an exposed edge such as scarves, shawls and afghans, can be tidied by adding a trim of single crochet.  (See below photo) This simple technique can hide any wonky edges or uneven stitches.  You can use the single crochet to mask any irregularities along the Striped Body edge.  Whether your Ridgley needs this last step is completely up to you, but you will love adding this technique to your knitting arsenal.  Even non-crocheters like me find use for this finishing skill in many projects.  See Single Crochet Video

ridgely9

To add the single crochet edge to Ridgely, begin with right side facing and starting at the right hand end of the Striped Body edge.  With a size B or C hook, move from right to left working a single crochet in desired color.  Work the crochet spaced at an even rate to match the tension of the finished edge.  Unlike knitting, crochet is easily unraveled to make adjustments.  When the left end is reached, cut the yarn and draw it through the last loop on the crochet hook.

To download a printable version of these instructions, click here.  Look for a condensed, full version pattern of Ridgely at the end of the month available in my Pattern Shop and Ravelry.

ridgelyfinal

Please remember to enter the prize drawing.  Your entry provides Skacel with valuable feedback and participation numbers.  This KAL would not be possible without their sponsorship!

It has been my privilege to further your knitting education with the Progressive Needles Knit Along.  Your kind comments, beautiful photos and encouragement towards others have created a warm knitting community right here.  I look forward to knitting with you once again in July!  (To learn more, read below.)

Happy knitting,

Michelle

July Knit Along

Please join me for a Summer Rerun of one of my favorite KALs – Center of Attention!  We know that many knitters choose pursuits other than knitting in the warmer months so we are waiting until Fall to debut a new yarn and pattern.  (I promise, you will be dazzled!)  Also, with so many new participants in the KAL, it will be fun introducing them to this great toe up sock design.  If you have been a faithful KALer from the start, use the opportunity to knit another pair and get a jump on your holiday projects while donating to a good cause.

Why Center of Attention?  This pattern is special for two reasons.

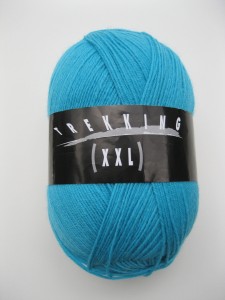
  1. For every skein of Trekking XXL “Susanne” purchased, Skacel will donate $10 to the Marsha Rivkin Center for Ovarian Cancer Research.  This lovely sock yarn was specially dyed in the turquoise color of ovarian cancer awareness.
  2. Because of this pattern, I met so many of you!

Be sure to subscribe to my newsletter to receive updates and reminders for all upcoming Knit Alongs.  See you in July!

Supply List

coa13

  • Trekking XXL – 75% Superwash Wool, 25% Nylon – 459 yards/100g (one skein).  Sample knit in Color “Susanne”.
  • Size 1 (2.5mm) needles or size necessary to achieve gauge of 8 stitches per inch.  Pattern may be knit with double points, two circular knitting method or magic loop.
  • Cable needle

Ridgely – Part 3

KPHtemplate_header

ridgely4

Part Two is complete and we are more than halfway done with Ridgely!  As you can see from the above photo – I use lifelines, too.  I love how the center lace design flows beautifully with the lace border.  (See below photo)  Part Three returns us to knitting with all three skeins as in Part One.

ridgely5

I know that many of you are concerned about the remaining yardage for Ridgely.

Here are my yarn weights and approximate yardage remaining after Part 2:

  • MC – 22g/96 yards
  • CC – 33g/145 yards
  • MC2 – 34g/149 yards

After Part 3 (conclusion of knitting):

  • MC – 4g/17 yards
  • CC – 16g/70 yards
  • MC2 – 21g/92 yards

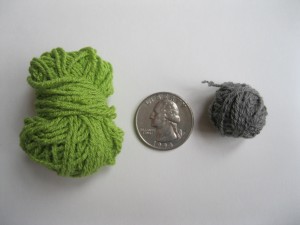
While I had ample Cobasi remaining in my MC (Striped Body) skein at the end of Ridgely, one of my test knitters had only 2 yards remaining!  (See below photo)  Before rejoining the yarns in Part 3, we need to “steal” a little bit of yarn from our MC2 (Lace Border) skein as an insurance policy.  I recommend winding off 15-20 yards of your MC2 skein to set aside as a safeguard against a shortage.  It would be much easier to use this reserve skein than trying to borrow from the MC2 skein in the midst of the project.  For many of you this is unneeded, but better safe than sorry!

ridgely6

Part Three is the Decrease Section of Ridgely and is knit much as Part One except one stitch is decreased before the marker in Rows 1, 5 and 9.  The Set Up row places the marker between the Body and Border and rejoins the MC2 skein requiring a return to interlocking.  The CC skein is rejoined in Row 3.  Work the Decrease Section until 16 stitches remain – 2 stitches in the Striped Body and 14 stitches in the Lace Border.  Knit one more row and then bind off all stitches.  The knitting is complete!

Don’t worry, we still have more ahead!  The education continues in Part Four as we focus on finishing techniques to give Ridgely a professional look.  Expert blocking tips and an optional edge treatment will be introduced.  I have several reasons for concluding the knitting after 3 sections:

  1. Ample time to finish the project.  I want everyone to enter the prize drawing!
  2. Most patterns devote too little time to the proper finishing of garments.  This step truly elevates your work!

I have enjoyed each and every photo posted on Ravelry and I can’t wait to see your new posts.  Happy knitting!

Part Three

Click here to download printable version

KPHtemplate_instructions

Decrease Section

Return to knitting with 3 skeins as in Increase Section of Part One.

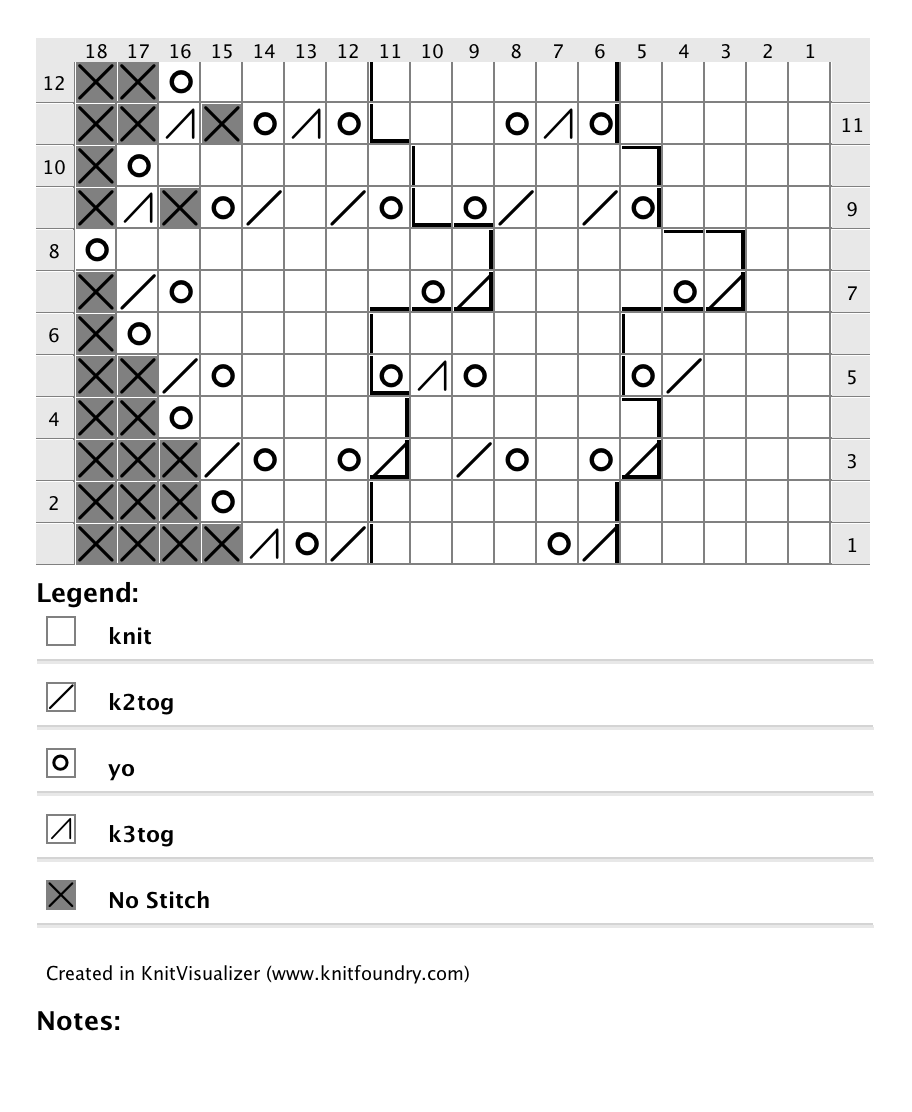
The Lace Border Chart is included here for your convenience.

Set Up

1.  (MC) K60, k2tog, place marker, (MC2) k3, k2tog, yo, k4, k2tog, yo, k3tog.

Continue with Row 2 in Striped Body/Lace Border pattern (below).  CC skein will be rejoined in Row 3.

ridgelybdr3

Striped Body/Lace Border (12 row repeat)

Asterisk (*) indicates decrease row – one stitch decreased.

*Row 1.  (MC) Knit to 2 stitches before marker, k2tog, (MC2) k3, k2tog, yo, k4, k2tog, yo, k3tog.

Row 2.  (MC2) Yo, k12, (MC) knit to end of row.


Row 3.  (CC) Knit to marker, (MC2) k2, k2tog, yo, k1, yo, k2tog, k1, k2tog, yo, k1, yo, k2tog.

Row 4.  (MC2) Yo, k13, (CC) purl to end of row.


*Row 5. (MC) Knit to 2 stitches before marker, k2tog, (MC2) k1, k2tog, yo, k3, yo, k3tog, yo, k3, yo, k2tog.

Row 6.  (MC2) Yo, k14, (MC) knit to end of row.


Row 7.  (CC) Knit to marker, (MC2) k2tog, yo, k4, k2tog, yo, k5, yo, k2tog.

Row 8.  (MC2) Yo, k15, (CC) purl to end of row.


*Row 9. (MC) Knit to 2 stitches before marker, k2tog, (MC2) k2, yo, k2tog, k1, k2tog, yo, k1, yo, k2tog, k1, k2tog, yo, k3tog.

Row 10.  (MC2) Yo, k14, (MC) knit to end of row.


Row 11. (CC) Knit to marker, (MC2) k3, yo, k3tog, yo, k3, yo, k3tog, yo, k3tog.

Row 12.  (MC2) Yo, k13, (CC) purl to end of row.        


Work above repeat until 16 stitches remain ending after Row 12. 

(2 Striped Body stitches + 14 Lace Border stitches.)

With MC, knit across all stitches.

Bind off all stitches.


Ridgely – Part 2

KPHtemplate_header

ridgely3

I hope you had fun knitting with the three skeins of Cobasi as you watched Ridgely take its shape.  While I adore colorwork, Part Two takes a respite from color knitting as we concentrate on the center of the shawl.

We will be creating a Center Lace Panel as the focal point of the shawl.  To begin, work Rows 1 thru 10 of the Striped Body/Lace Border Section as in Part One.  There are now 62 stitches in the Striped Body section and 15 stitches in the Lace Border section – this stitch count is crucial to the Center Lace Panel.  After the completion of Row 10, work the Set Up Rows for the Center Lace Panel.  The Set Up Rows and the Center Lace Panel are worked with the MC skein only.  The CC and MC2 skeins may each be cut at this point leaving 8″ tails to weave in later.  After completing the Set Up Rows, continue with Row 1 of the Center Lace Panel.  Because all of the stitches are knit using the MC skein, there is no need to interlock any longer.  The Center Lace’s 12 row repeat is worked a total of 3 times.  (The Set Up Rows are NOT a part of the first repeat.)  I highly recommend placing a Lifeline prior to working the Center Lace Panel.  I have provided a stitch count at the end of each Right Side row to assist you.

The Center Lace Panel instructions are in both written and charted formats so you may choose the style most comfortable to you.  This chart is a bit more involved to read than the Lace Border chart but it follows the format used in many of today’s most popular patterns.  To use the chart, work the stitches before the bold line once.  Then, repeat the six stitches within the bold lines until the required number of stitches after the bold line remain.  Lastly, work the stitches after the bold lines.  The number of stitches required to work the end of the row (after bold lines) can be confusing for new chart users.  It is imperative to calculate the correct number of stitches needed to execute these operations.  Each symbol in the chart may need more than one stitch to execute the operation.

As an example, let’s work through Row 1 of the chart:

  • Work the stitches before the bold line – k5.
  • Repeat the stitches within the bold lines – k2tog, yo, k4 until the the correct number of stitches remain.
  • To work the three symbols after the bold line, five stitches are required – two for the k2tog, zero for the yarn over (no stitches are needed to make a yo), and three for the k3tog.

The best news is that you can try your hand at the chart and self-check by referring to the written row instructions.  I encourage you to stretch yourself and increase your chart know-how as any magazines, books and patterns rely solely on charted instructions.  As always, I’m here to help you along the way!

Part Two

Click here to download printable version

KPHtemplate_instructions

Pattern Notes

  • A Lifeline is recommended prior to beginning the Center Lace Panel.
  • Center Lace Panel is worked with MC skein over ALL stitches.
  • To use Center Lace chart, work stitches before bold line once.  Repeat the stitches within bold lines until the required number of end stitches outside the lines remain.  Note that some rows ending with k3tog require more stitches than chart indicates.  Refer to written instructions to verify if needed.


Striped Body/Lace Border (cont.)

Work Rows 1 through 10 in established pattern (as in Part 1) ending after Row 10.  There are now 62 stitches in the Striped Body section, 15 Lace Border stitches.

Continue with Set Up for Center Lace Panel.


Center Lace Panel

All stitches in Center Lace Panel are worked with MC skein only!  CC skein and MC2 skein may be cut leaving an 8” tail to weave in later.


Set Up

Row 1.  Working all stitches with MC skein, knit to marker, slip marker, (continue with MC skein) k3, yo, k3tog, yo, k3, yo, k3tog, yo, k3tog.

Row 2.  With MC, yo, k13, remove marker, (continue with MC skein) and knit to end of row. (76 stitches)

Continue with Row 1 of Center Lace Panel.

Center Lace Panel Chart

All stitches worked in MC.

ridgelycntr2

Center Lace (12 row repeat)

All stitches worked with MC skein only.  Stitch count given in ( ).

Row 1.  K5, *k2tog, yo, k4; repeat from * to last 5 stitches, k2tog, yo, k3tog. (74 sts)

Row 2 (and ALL even numbered rows through Row 12).  Yo, knit to end of row.

Row 3.  K4, * k2tog, yo, k1, yo, k2tog, k1; repeat from * to last 5 stitches, k2tog, yo, k1, yo, k2tog.  (75 sts)

Row 5.  K3, k2tog, yo, *k3, yo, k3tog, yo; repeat from * to last 5 stitches, k3, yo, k2tog.  (76 sts)

Row 7.  K2, *k2tog, yo, k4; repeat from * to last 9 stitches, k2tog, yo, k5, yo, k2tog.  (77 sts)

Row 9.  K4, *yo, k2tog, k1, k2tog, yo, k1; repeat from * to last 8 stitches, yo, k2tog, k1, k2tog, yo, k3tog.  (76 sts)

Row 11.  K5, *yo, k3tog, yo, k3; repeat from * to last 6 stitches, yo, k3tog, yo, k3tog. (75 sts)

Row 12.  Same as Row 2.

Work above repeat 3 times.  (76 stitches)

Happy knitting!

Ridgely – Part One

KPHtemplate_header

Welcome to the Progressive Needles Knit Along sponsored by Skacel Collection.  I am delighted to have so many knitters return to the KAL and love that we have many first timers with us as well.  Our spring pattern, Ridgely, is brimming with essential techniques, new video lessons and more fun with Cobasi yarn!  Before we begin, here’s a quick overview of how the KAL works:

  • A portion of the pattern is revealed here every Thursday in April.  The complete pattern, video resources and lots of helpful tips are included in each post.  An abbreviated, pattern-only version is included to download.
  • All techniques are supported with video instruction at knitpurlhunter.com
  • All questions and comments are monitored daily both here and in the Knit Purl Hunter group on Ravelry.  It’s like having your own private knitting tutor!
  • Completed projects are eligible for the monthly prize drawing – first prize is a set of addi Clicks!  See skacelknitting.com for all the info.
  • Weekly prizes are awarded to knitters who locate the prize “clues” hidden in the Skacel and Knit Purl Hunter websites.  A small tag line will be inserted in the sites at random intervals with instructions on how to claim the prize.  (Example: Be the first to email “I love addis” in the subject line, etc.)  One weekly prize per knitter, please.

Now on to the knitting!  Ridgely is a two-colored, striped shawlette trimmed with a lace border.  The striped section will be worked simultaneously with the lace border avoiding the need to attach the border at the end of the project.  To accomplish this, all three skeins will be used at one time.  One Main Color skein (MC) and the Contrasting Color skein (CC) will be used for the striped section.  The second Main Color skein (MC2) will be used for the Lace Border.  The skeins are handled in the same manner as in Intarsia knitting where the yarns are interlocked when changing skeins.  Simply stated, work the Striped Section with MC or CC and then interlock the yarns before moving on to the Lace Border worked in MC2.  Sound confusing?  No worries, I walk you through each step with lots of helpful info in the Ridgely -Part 1 Video.  This is my most comprehensive video to date!  In it, I work through the first repeat and give tips in each row to help you manage multiple skeins, carry yarns expertly and simplify the start of Ridgely.  I recommend first watching my Intarsia Video for an up close tutorial if you are new to the technique.

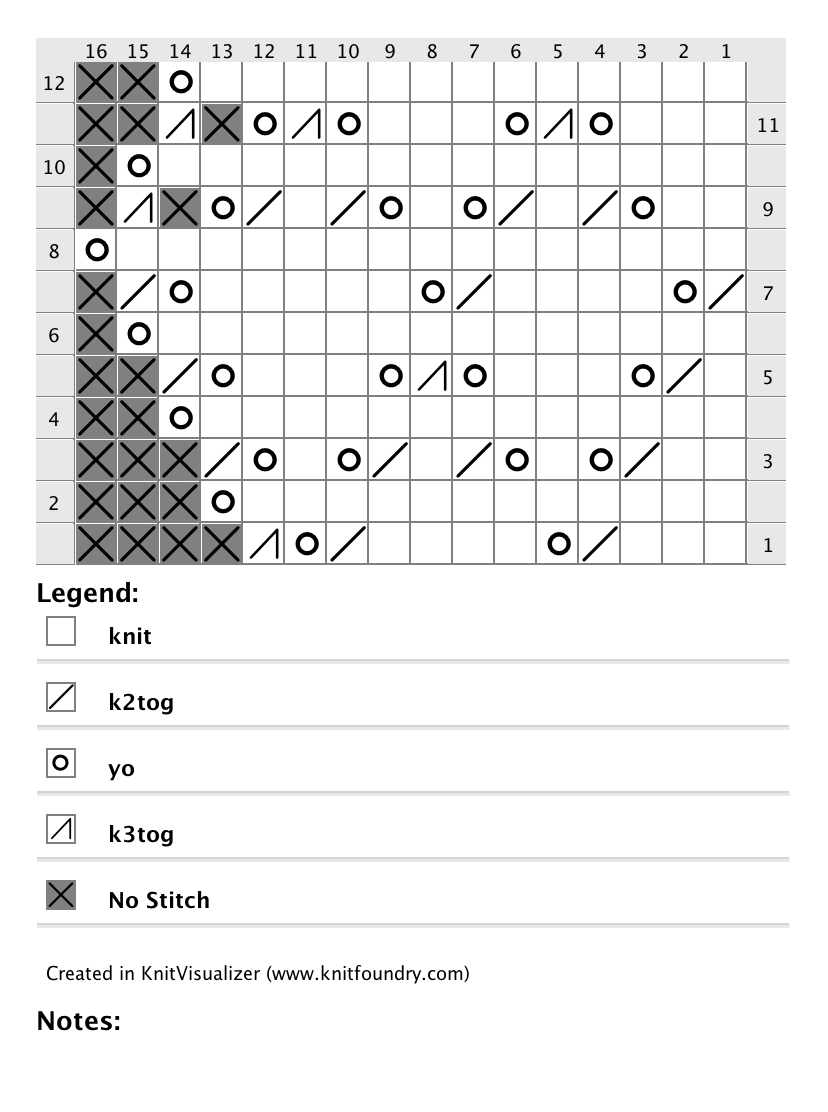
The Striped Section directions are in written form only and spell out the increase instructions and indicate which color to use in each row.  The Lace Border instructions are given in both written and charted forms.  The lace pattern is garter stitch based and is designed to lie flat against the shawl.  Its chart is a bit unconventional in that the same symbol represents a knit stitch on both the right and wrong side.  I like this simpler version when using garter stitch in a chart.  The chart also includes a symbol (X) marking a “no stitch”.  This is simply a place holder due to the changing stitch count of the lace.  When the “no stitch” symbol is reached in the row, ignore it and go to the next symbol on the chart.  As a reminder, charts are read from bottom to top beginning at Row 1.  The Right Side rows (odd numbered) are read right to left and the Wrong Side rows (even numbered) are read left to right.  If you are unsure of the chart, or just prefer written directions, refer to the line by line text.  In these written instructions, the Lace Border (MC2) stitches are in bold for easy tracking.

All of the wrong side rows in the Lace Border begin with a Yarn Over.  The first time I came across a yarn over at the beginning of a row I was perplexed.  How could something so simple have me stumped?  After much over thinking, the simple solution was waiting for me.  If you are similarly stumped, watch the Yarn Over at Beginning of Row Video as I demonstrate the stitch you will use to start every wrong side row.

I highly recommend that you carefully read over the Pattern Notes before beginning the shawlette to familiarize yourself with the instructions.  I also recommend the use of Lifelines in any lace project to avoid tricky repair work.  See Lifelines Video

Enjoy the pattern and your new skills.  I look forward to following your progress!

Ridgely – Part One

Click here to download printable version

KPHtemplate_materials

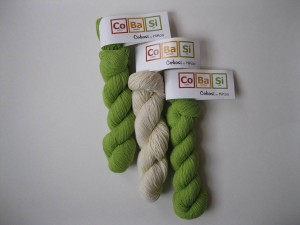
  • 3 skeins Cobasi – 2 Main Color, 1 Contrasting Color.
  • US #6 (4mm) needles, straight or circular, or size needed to obtain desired gauge.
  • Crochet Hook – size B or C for optional finishing technique

KPHtemplate_gauge

Approximately 7 stitches = 1 inch in stockinette.

KPHtemplate_size

After blocking, approximately 56” along top edge and 12” deep at center point.

Prior to blocking, approximately 50” X 11”.

KPHtemplate_abbreviations

CC – contrasting color.

k2tog – knit two together.  See K2tog Video

k3tog – knit three together.

kfb – knit into front and back of stitch.  See Kfb Video

MC – main color.

MC2 – second skein of main color.  (Used in lace border.)

 yo – yarn over.  See Yarn Over Video

KPHtemplate_instructions

See Ridgely – Part 1 Video

Pattern Notes

  • Odd numbered rows are Right Side.  Even numbered rows are Wrong Side.
  • Stitches before marker form the Striped Body and are worked in MC or CC.
  • Stitches after marker form the Lace Border and are worked at the same time with a second skein of main color – MC2.
  • Lace instructions are in chart (below) and text (next page) formats.
  • Lace Border chart is used after the marker in Increase Section.
  • Lace Border stitches in the text are in bold for easy tracking.
  • Skeins must be “interlocked” at marker as in Intarsia.  See Intarsia Video
  • Always interlock on the wrong side.  After interlocking on the wrong side, place the working yarn in the correct position for the next stitch, i.e. knit or purl position.
  • Increases are worked in Rows 1, 5 and 9 in MC.
  • Remember to purl with CC in the Striped Body on Rows 4, 8 and 12.

Lace Border Chart

Lace Border stitches worked in MC2.

ridgelybdr3

Increase Section

Using Main Color, cast on 16 stitches.

Set Up

Row 1.  (MC) K1, kfb, place marker, k3, k2tog, yo, k4, k2tog, yo, k3tog.

Row 2.  (MC) Yo, k12, slip marker, k3.

Continue with Row 3 (below) in Striped Body/Lace Border pattern.


Striped Body/Lace Border (12 row repeat)

Asterisk (*) indicates increase row – one stitch increased.

*Row 1.  (MC) Knit to 1 stitch before marker, kfb, (MC2) k3, k2tog, yo, k4, k2tog, yo, k3tog.

Row 2.  (MC2) Yo, k12, (MC) knit to end of row.


Row 3.  (CC) Knit to marker, (MC2) k2, k2tog, yo, k1, yo, k2tog, k1, k2tog, yo, k1, yo, k2tog.

Row 4.  (MC2) Yo, k13, (CC) purl to end of row.


*Row 5. (MC) Knit to 1 stitch before marker, kfb, (MC2) k1, k2tog, yo, k3, yo, k3tog, yo, k3, yo, k2tog.

Row 6.  (MC2) Yo, k14, (MC) knit to end of row.


Row 7.  (CC) Knit to marker, (MC2) k2tog, yo, k4, k2tog, yo, k5, yo, k2tog.

Row 8.  (MC2) Yo, k15, (CC) purl to end of row.


*Row 9. (MC) Knit to 1 stitch before marker, kfb, (MC2) k2, yo, k2tog, k1, k2tog, yo, k1, yo, k2tog, k1, k2tog, yo, k3tog.

Row 10.  (MC2) Yo, k14, (MC) knit to end of row.


Row 11. (CC) Knit to marker, (MC2) k3, yo, k3tog, yo, k3, yo, k3tog, yo, k3tog.

Row 12.  (MC2) Yo, k13, (CC) purl to end of row.        


Work above repeat 19 times ending after Row 12. (Set Up Rows are considered a part of 1st repeat.) There will be 59 stitches in the Striped Body area.

Happy knitting!

April KAL

Join me April 4th for

Ridgely

AprilKAL1

A two-colored shawlette perfect as a stylish neck accessory or to warm the shoulders on a cool spring evening!

Ridgely features techniques new to the Progressive Needles KAL all supported with video instruction.

Prizes supplied by our sponsor, Skacel Collection, include a set of addi-Clicks.

Materials

  • 3 skeins Cobasi – 2 Main Color, 1 Contrasting Color.  Sample knit with two skeins #7 (MC) and one skein #3 (CC).
  • US #6 (4mm) needles, straight or circular, or size needed to obtain gauge of 7 sts = 1 inch in stockinette.
  • OPTIONAL: Crochet hook for finishing technique, size B or C


How does the Knit Along (KAL) work?

  • A portion of the pattern is posted every Thursday in April at knitpurlhunter.com
  • Questions are monitored daily on my website and on Ravelry in the Knit Purl Hunter group
  • Completed projects are eligible for prizes furnished by our sponsor, Skacel Collection
  • No registration is required
  • It’s FREE!