We finish off the shawl with a charming lace pattern, a bit of striping, and a sweet little bind off which are all aimed at using nearly every inch of your yarn. For those of you who like a complete and condensed version of the entire Audition pattern, download it here.
Section #8 – Checkered Lace
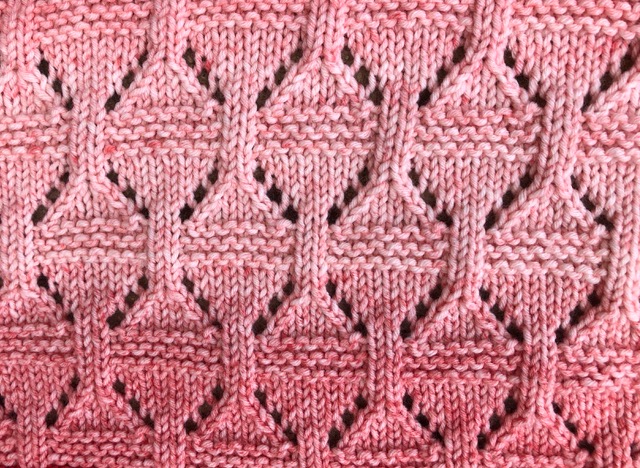
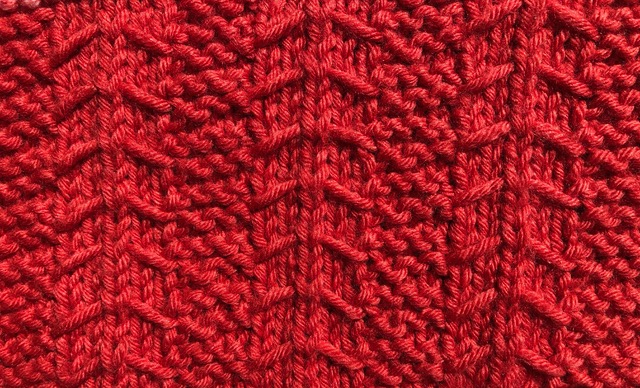
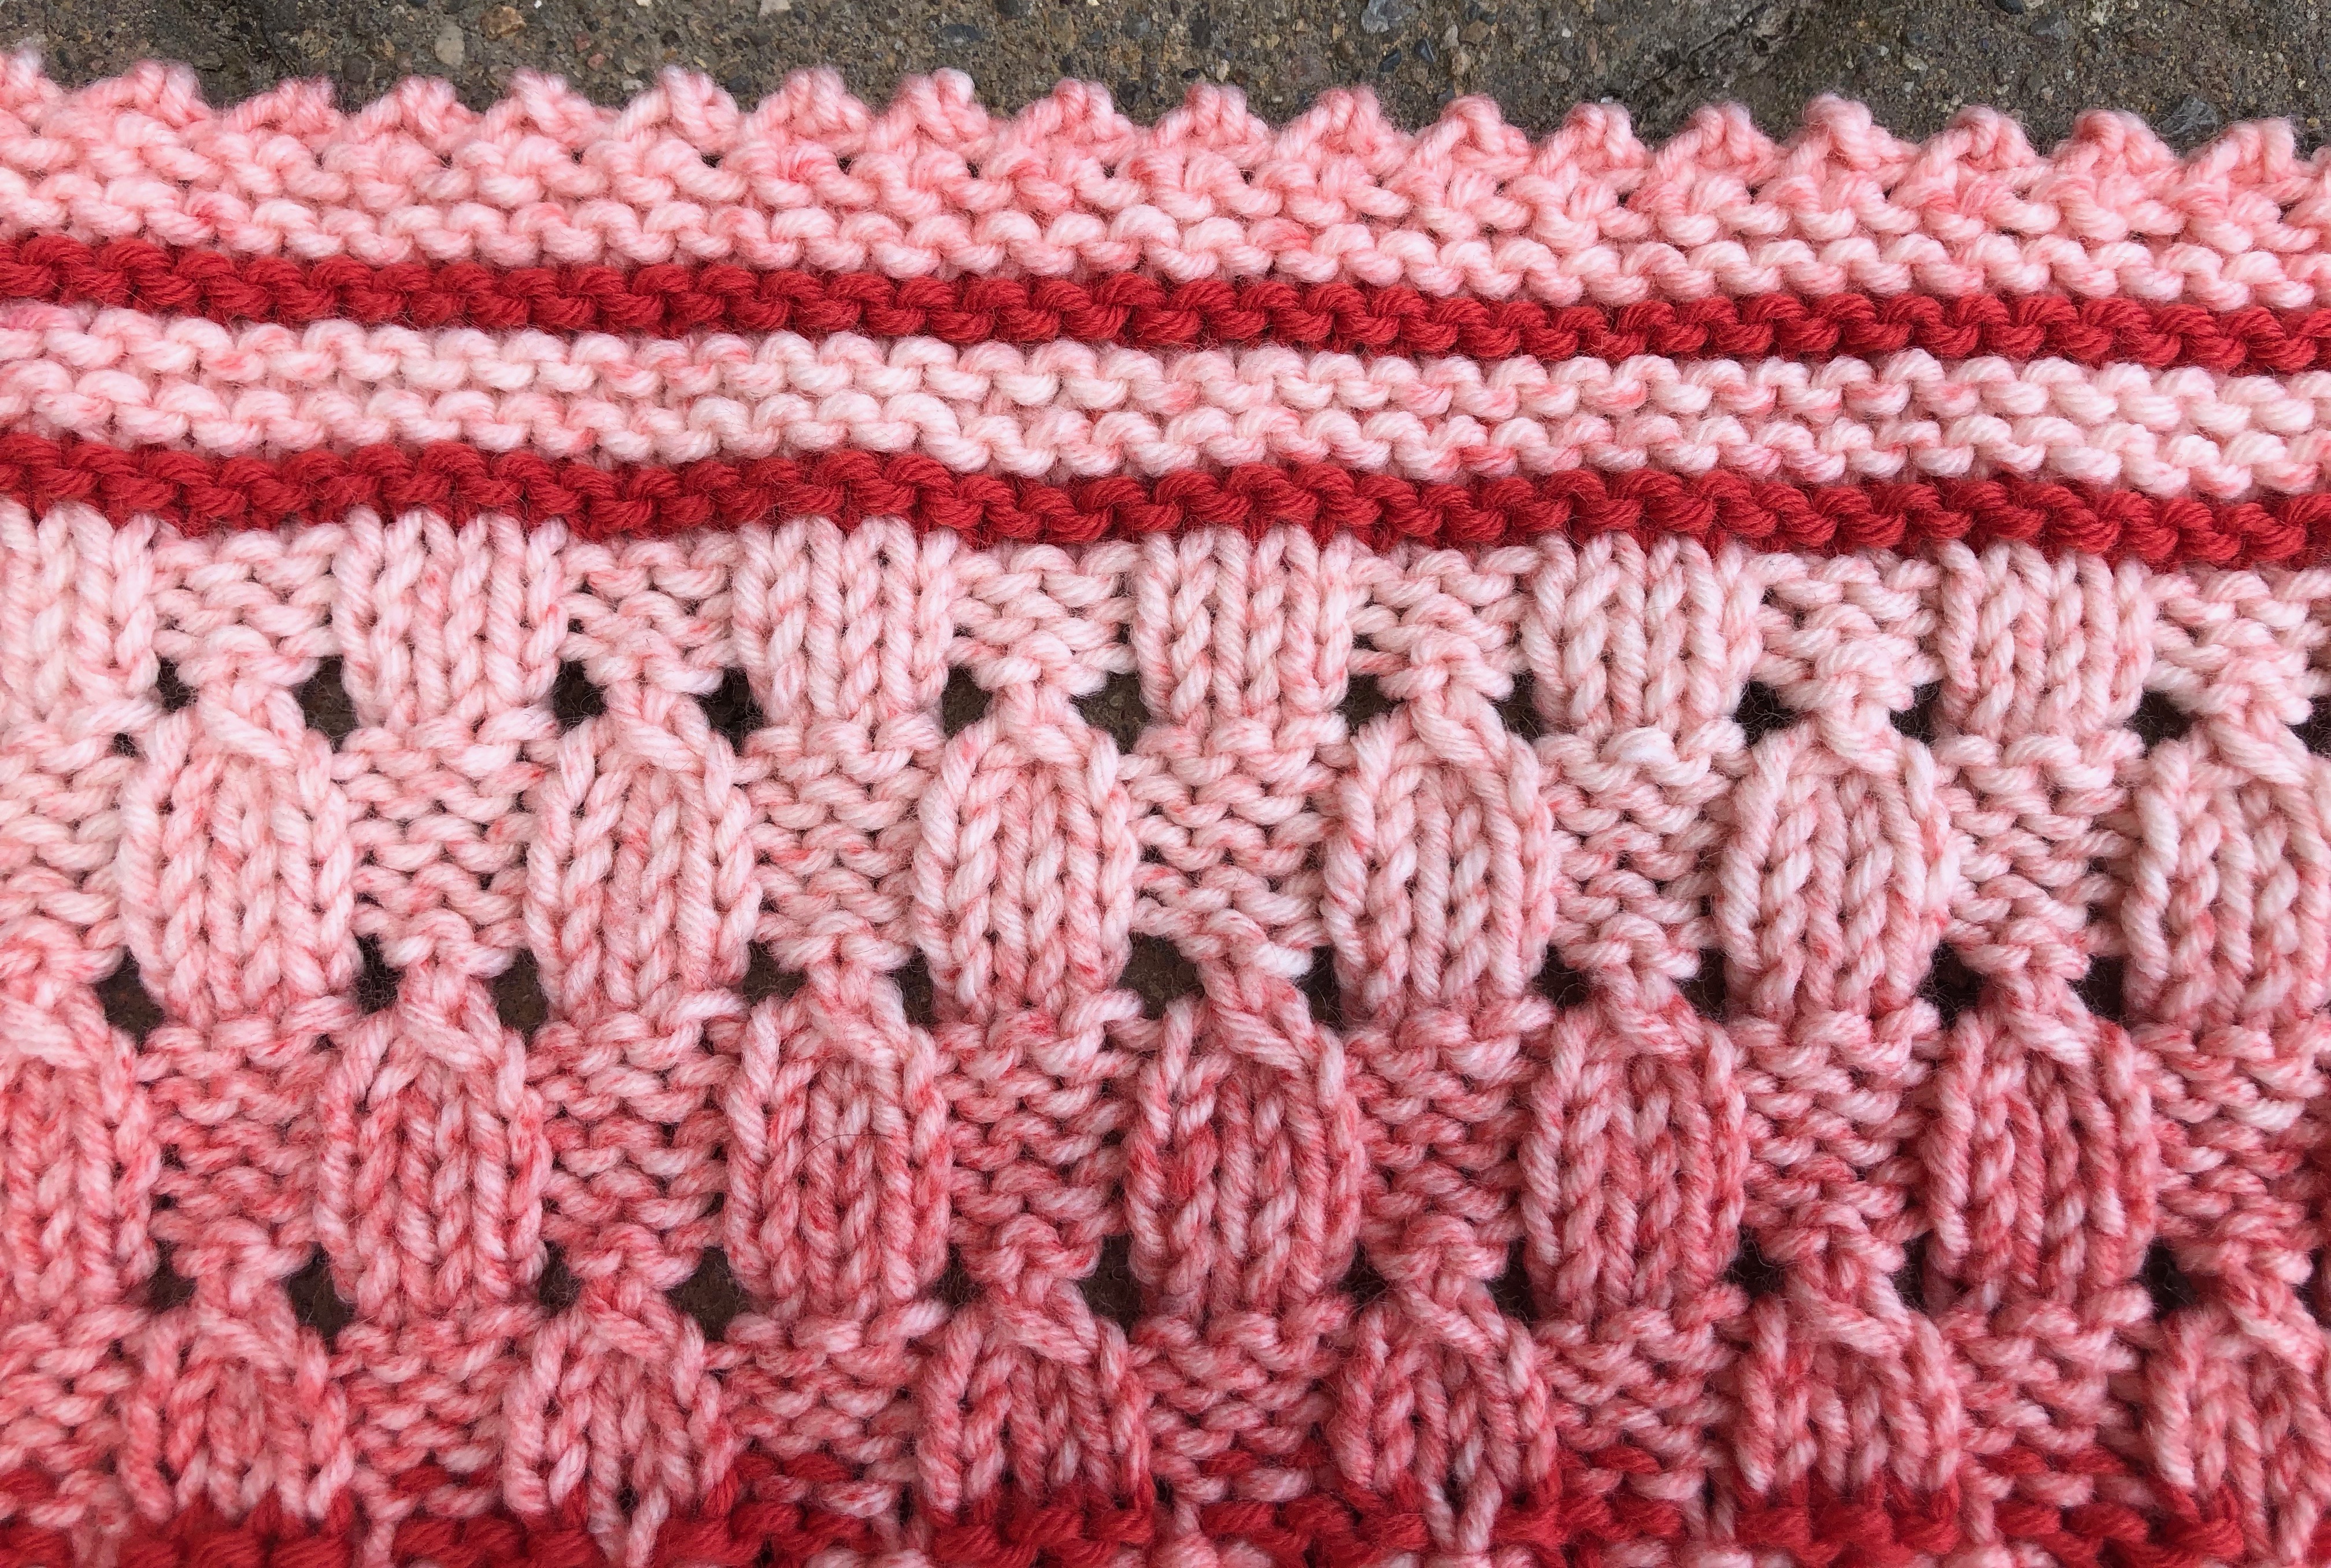
I am so enamored with this clever variation of the traditional checkerboard pattern. Like the original, this lacy version also creates a flat-lying fabric that is nearly reversible. It’s fast and easy and would make a great pattern for blankets and scarves.
The lace element is achieved by working a yarn over/SK2P/ yarn over sequence. An SK2P is a double decrease with a prominent left lean. It stands for Slip as if to knit, Knit 2 together, Pass the slip stitch over and off the needle. Slipping that first stitch as if to knit is what causes the stitch to lean to the left. When passing the slipped stitch over the k2tog, take care to pass the slip stitch off and not the yarn over that precedes it. Watch my SK2P video for a quick overview.
Section #9 – “Yarn Chicken”
At the end of Section #8 I had 21 grams of the MC and 11 grams of the CC which I cut at the end of Section #7. I chose to stripe the end of the shawl by using as much of the remaining yarn as possible. A scale to weigh the yarn is very helpful at this point. Weigh your yarn before and after a row to evaluate your usage. To preserve the garter stitch prior to the bind off, your striping must end after knitting a wrong side row. I recommend placing a lifeline in several rows of this section in case you find yourself losing the Yarn Chicken game (running out of yarn).
I have included my striping formula but this is just a guideline. You may have more or less yarn and any striping design is perfectly acceptable. I am looking forward to seeing everyone’s creations!
Bind Off
My favorite bind off with garter stitch is my own invention, the Channel Island Bind Off. It is more time consuming than a standard bind off, but this cutie lies flat and preserves the drape of the fabric. This technique uses slightly more yarn than a regular bind off so be sure to save enough yarn for this option. I used approximately 4 grams for the bind off.
I have written out the bind off instructions in the pattern, but have a detailed video in place to help you finish in style. See Channel Island Bind Off Video
Blocking
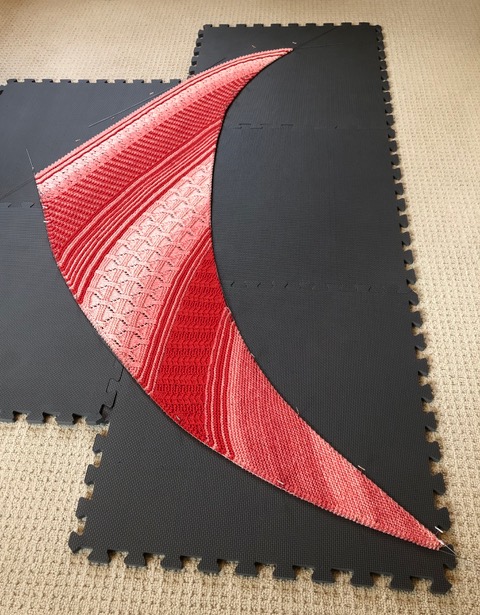
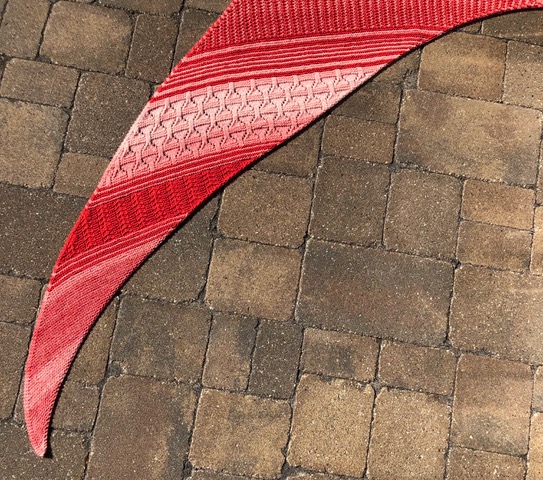
With the majority of the shawl worked in garter stitch, most likely your shawl will only require a light blocking. Steaming the fabric may be the only action needed to corral the edges. As seen above, I chose to run wires through the edges and lightly spritz with water and pin into place. I elected to preserve the curve of the piece because it helps the shawl settle nicely on the shoulders. As with any color work, soaking for long periods of time in a small amount of water may cause bleeding. While this yarn is colorfast, I would treat it with kid gloves to be on the safe side.
Wrapping Up
With your shawl completed, don’t forget to enter our sponsor’s prize drawing. Simply take a photo of your finished shawl and submit the form to Skacel by November 15th and you could win a set of addi interchangeable needles.
Thank You!
I owe a huge debt of gratitude to Skacel Collection for bringing these KALs to you for nearly ten years. Our partnership has enabled me to broaden the skills of so many knitters. I have delighted in the progress of each knitter and am humbled by the loyalty shown to my work.
While I am on hiatus, my videos and website will remain in place to assist you. I will continue to monitor my Ravelry group regularly to keep in touch and answer any lingering questions. I have four books to keep you busy in my absence so you won’t miss me too much.

Mostly, a big thank you to YOU! I so appreciate being a part of your knitting and I look forward to more knitting adventures.
Until we meet again, happy knitting!
Michelle
Part Four
Click here to download printable version
Abbreviations
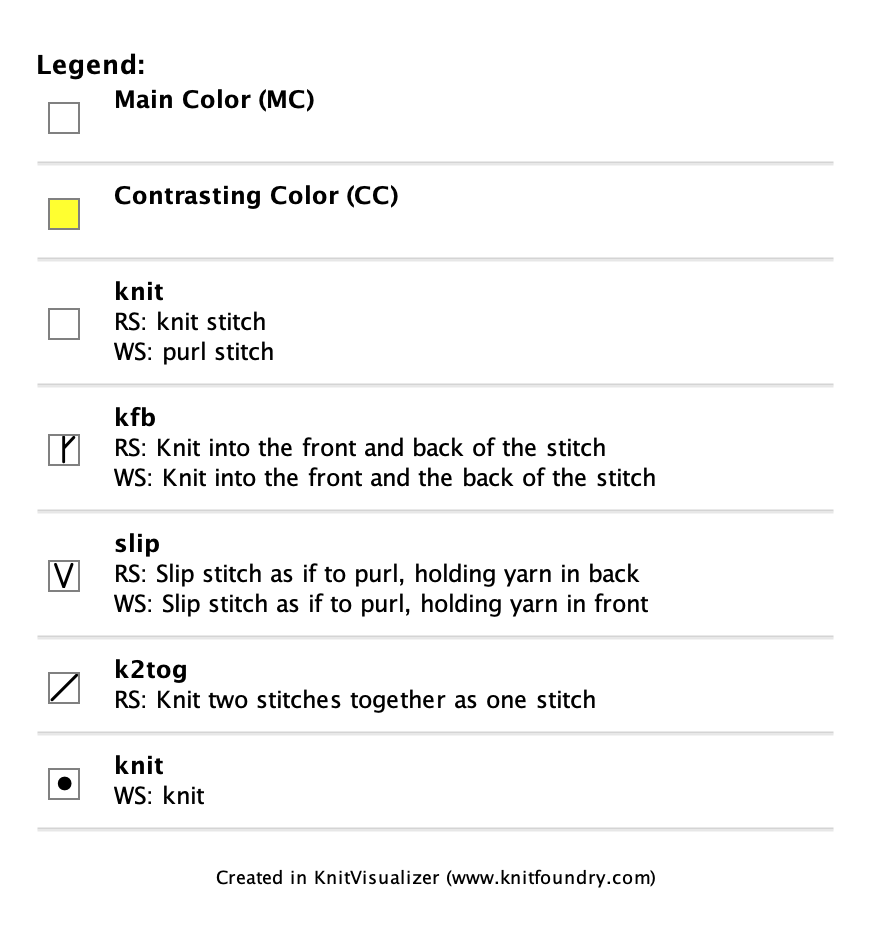
CC – contrasting color.
k2tog – knit two together. See K2tog Video
kfb – knit into front and back of stitch. See Kfb Video
MC – main color.
SK2P (sl 1, k2tog, psso) – slip next stitch as if to knit, knit two together, pass slipped stitch over decreased stitch and off the needle. Left leaning, double decrease. See SK2P Video
yo – yarn over. See Yarn Over Video
Instructions
Section #8 (All MC)
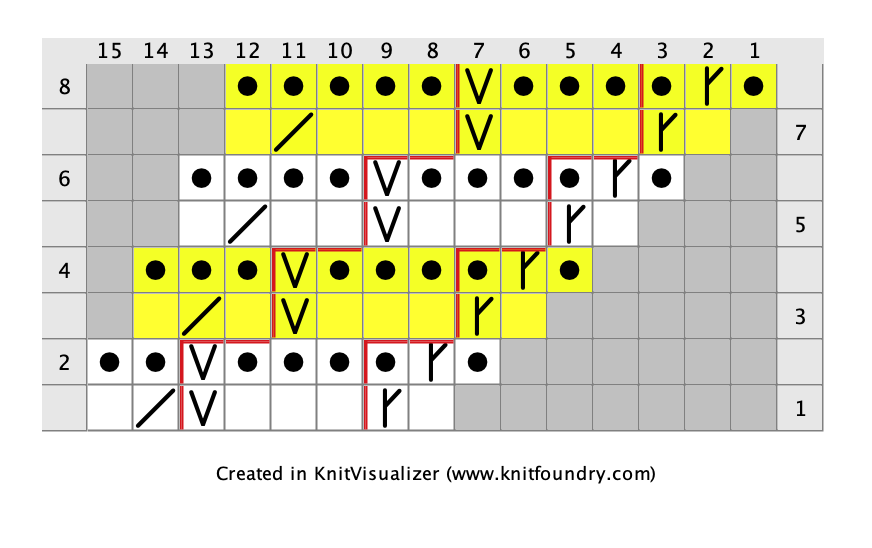
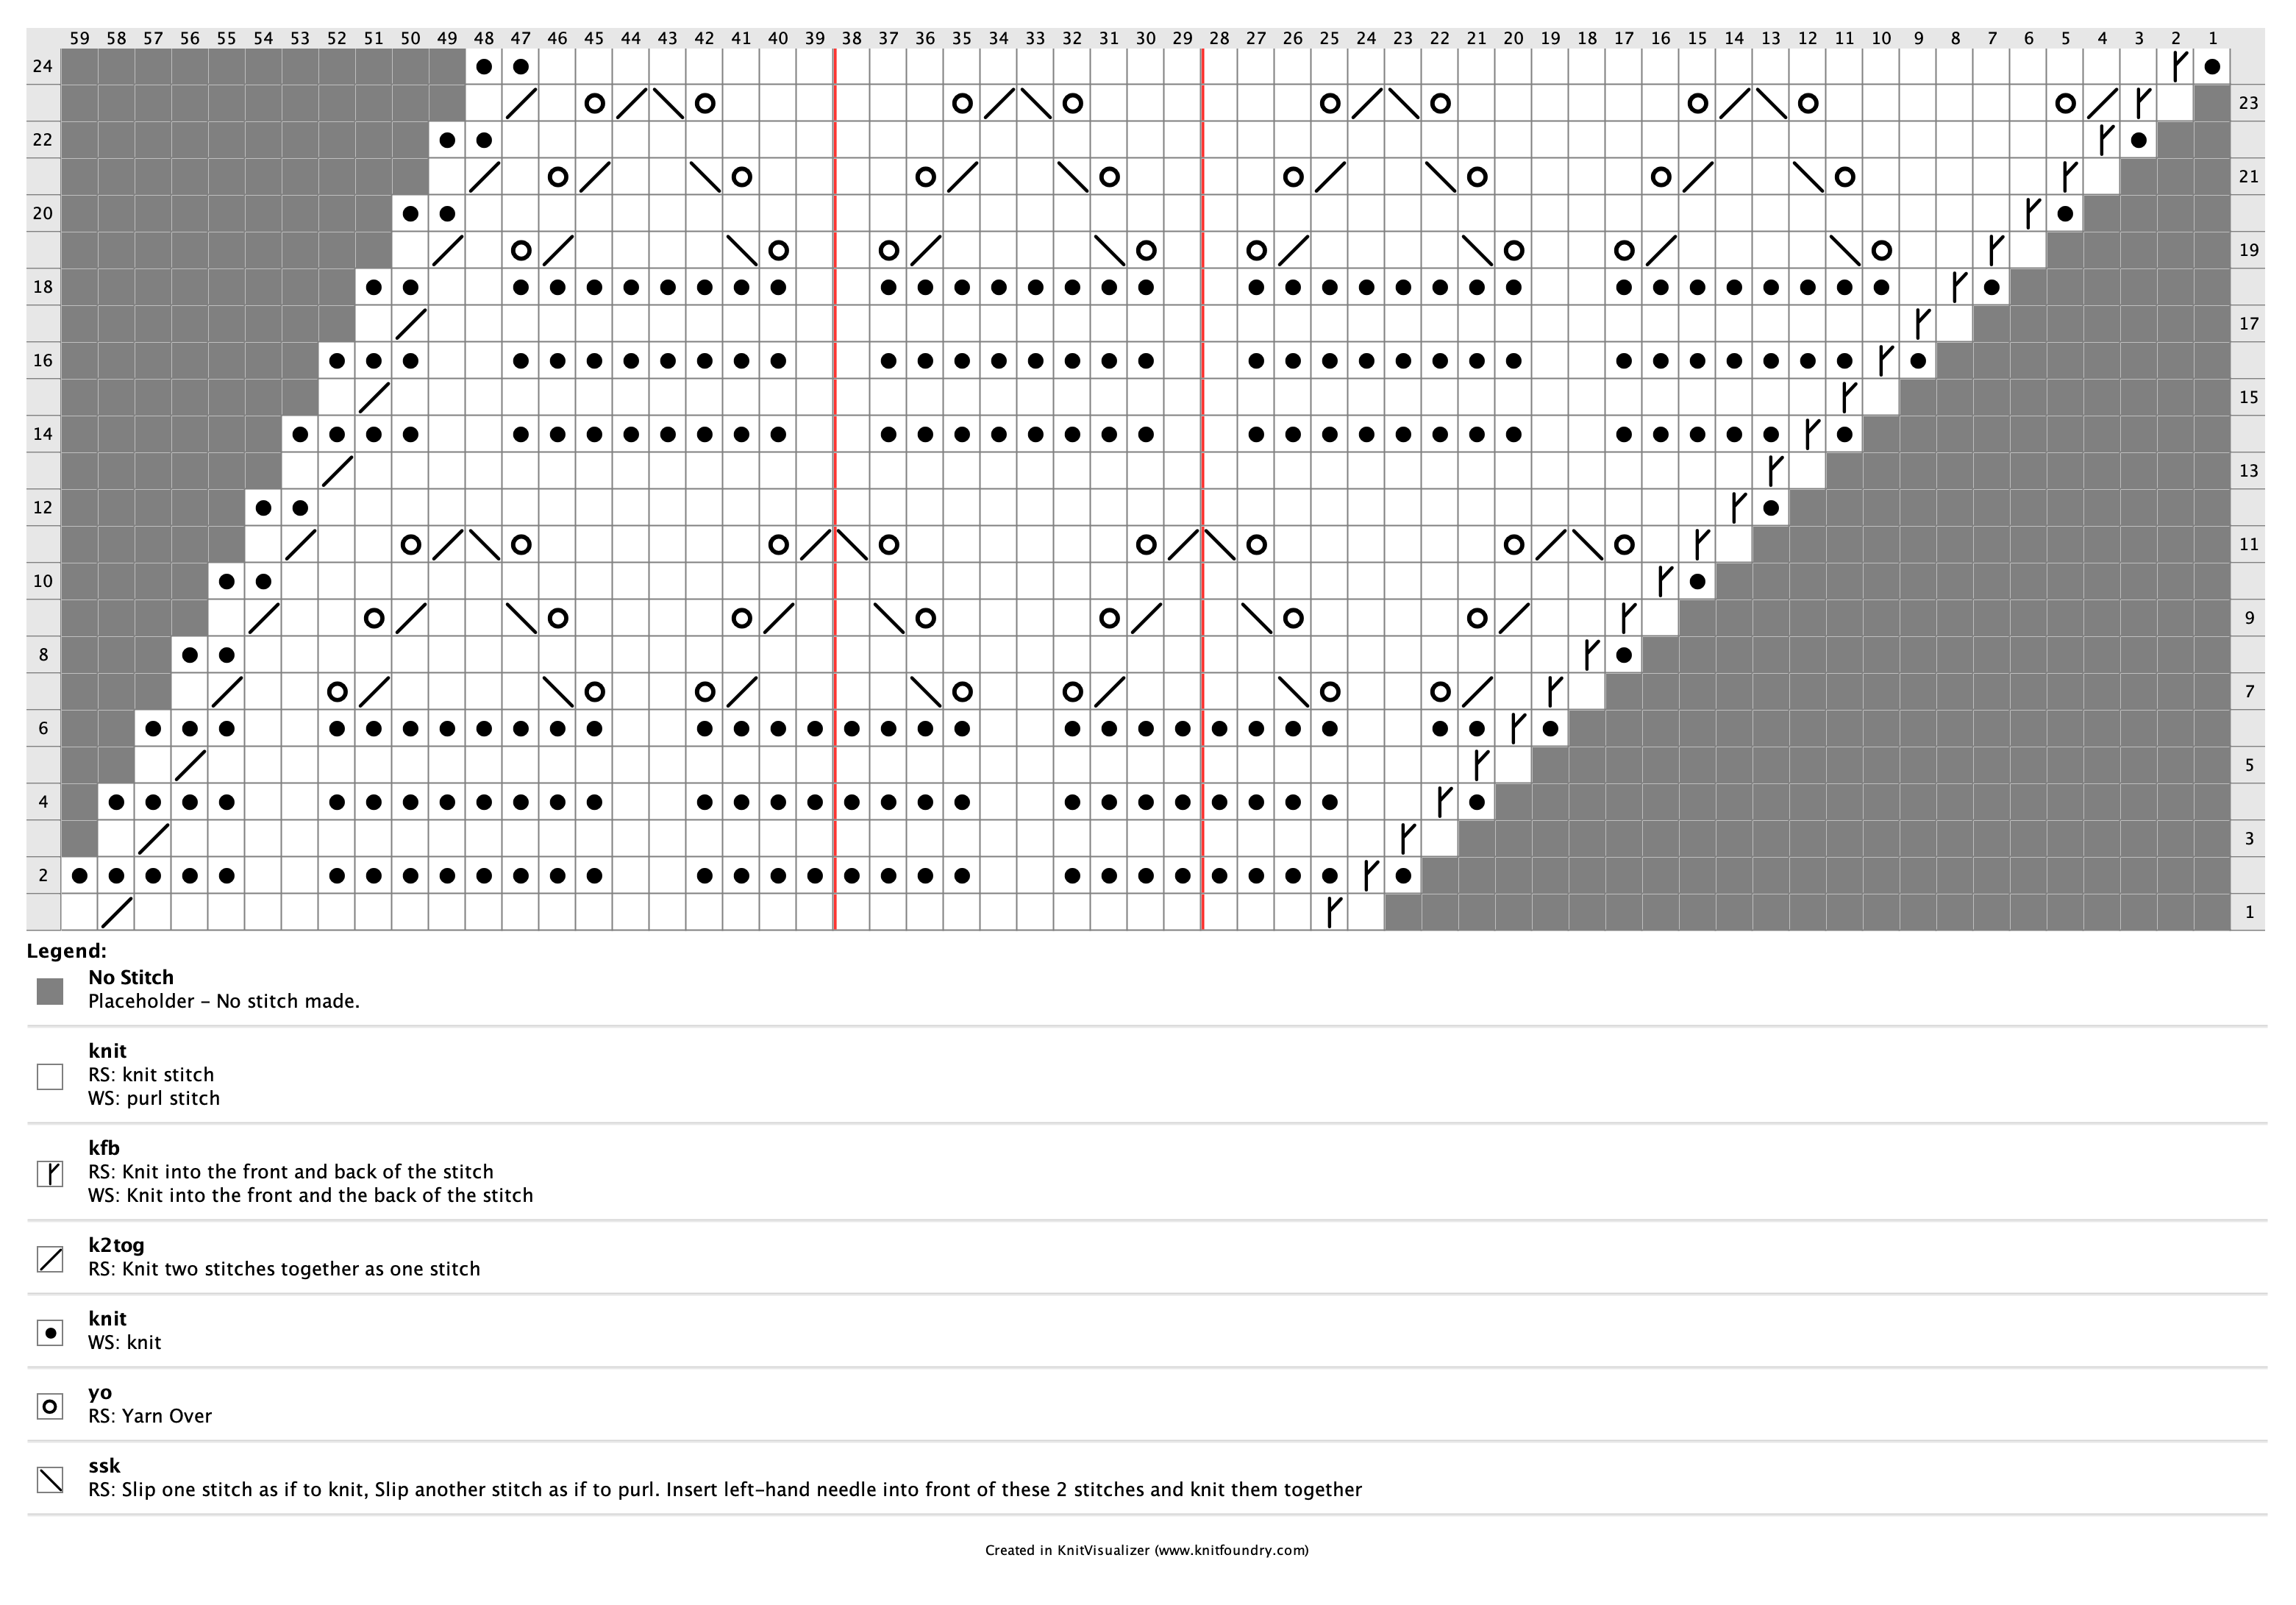
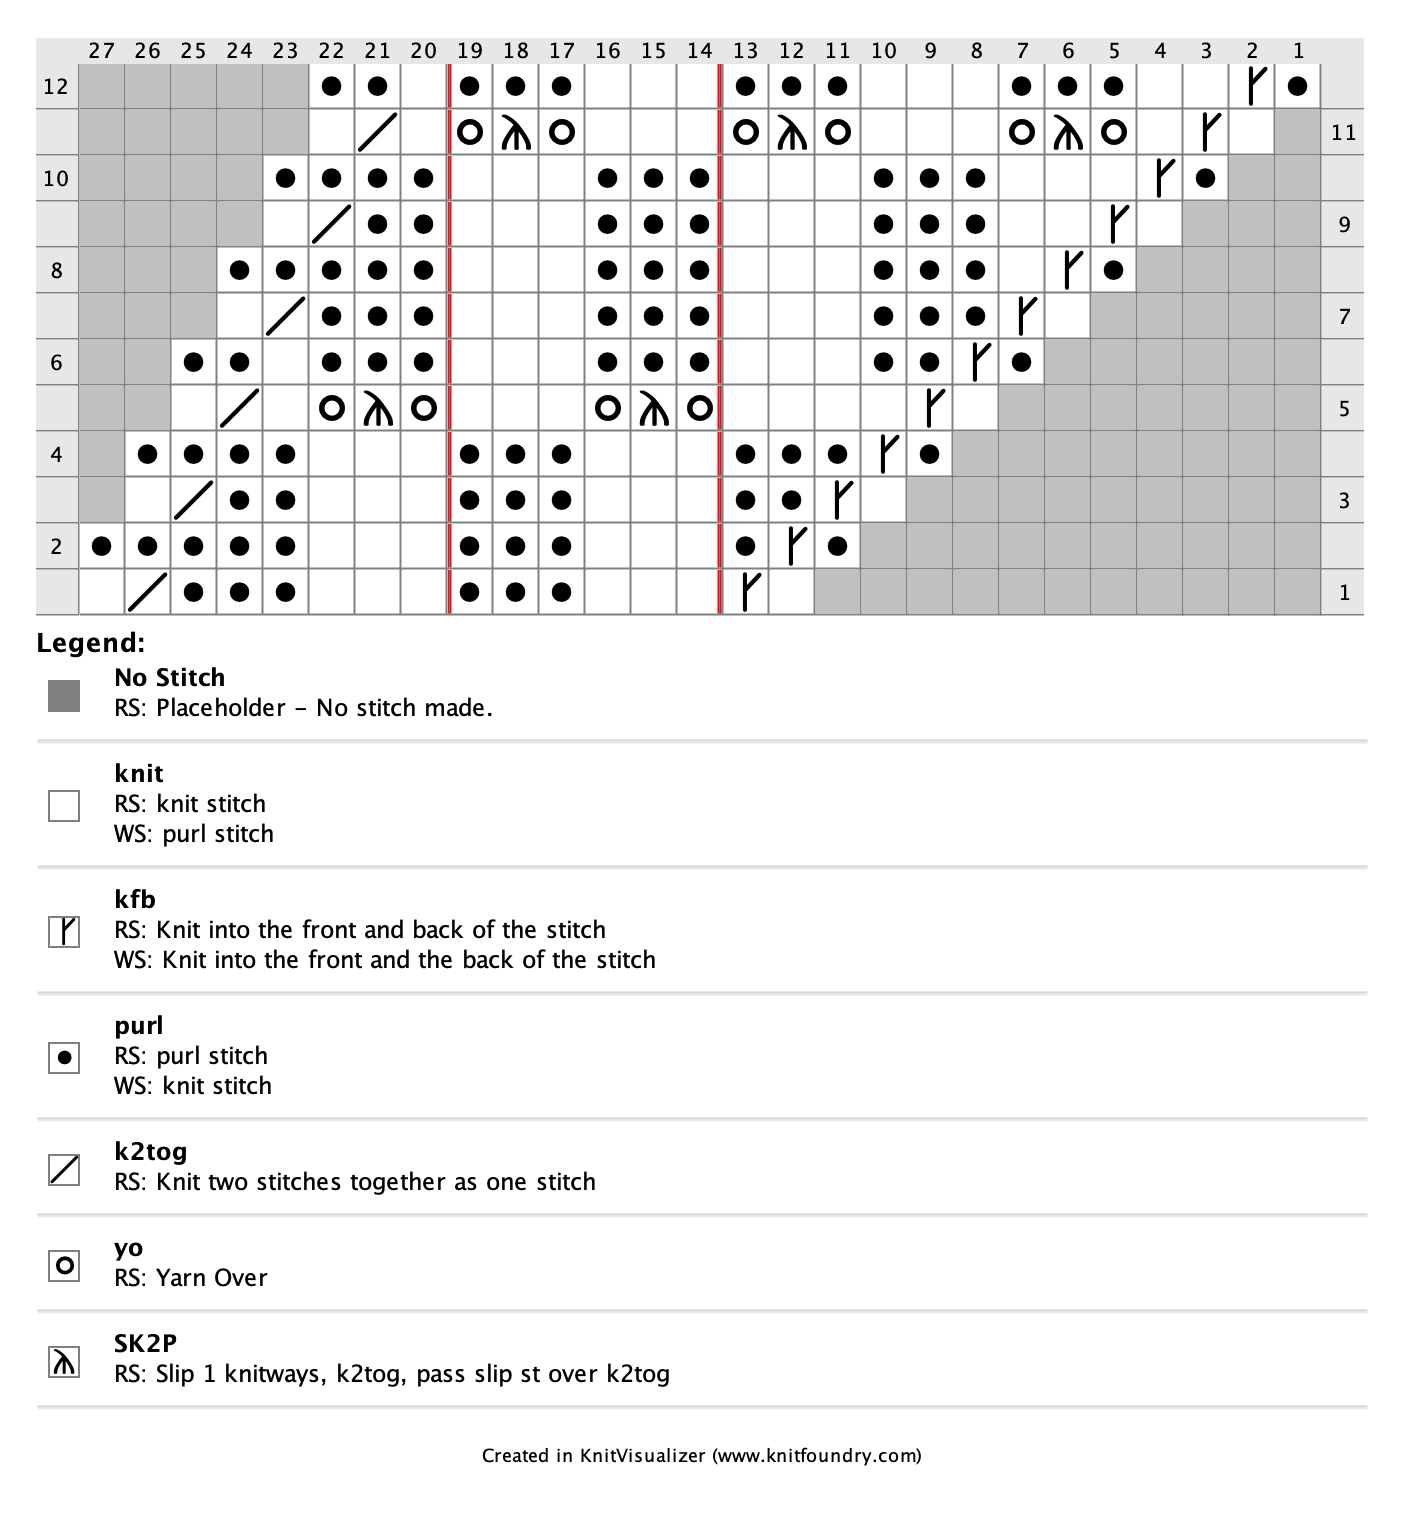
Checkered Lace (See Chart below)
Row 1. (RS) K1, kfb, *k3, p3; repeat from * to last 3 sts, k2tog, k1.
Row 2. (WS) K2, *k3, p3; repeat from * to last 3 sts, k1, kfb, k1. 162 sts
Row 3. K1, kfb, p2, *k3, p3; repeat from * to last 8 sts, k3, p2, k2tog, k1.
Row 4. K4, p3, *k3, p3; repeat from * to last 5 sts, k3, kfb, k1. 163 sts.
Row 5. K1, kfb, k4, *yo, SK2P, yo, k3; repeat from * to last 7 sts, yo, SK2P, yo, k1, k2tog, k1.
Row 6. K2, p1, k3, *p3, k3; repeat from * to last 7 sts, p3, k2, kfb, k1. 164 sts
Row 7. K1, kfb, *p3, k3; repeat from * to last 6 sts, p3, k2tog, k1.
Row 8. K5, *p3, k3; repeat from * to last 3 sts, p1, kfb, k1. 165 sts
Row 9. K1, kfb, k2, *p3. K3; repeat from * to last 5 sts, p2, k2tog, k1.
Row 10. K4, *p3, k3; repeat from * to last 5 sts, p3, kfb, k1. 166 sts
Row 11. K1, kfb, k1, yo, SK2P, yo, *k3, yo, SK2P, yo,; repeat from * to last 4 sts, k1, k2tog, k1.
Row 12. K2, p1, *k3, p3; repeat from * to last 7 sts, k3, p2, kfb, k1. 167 sts
Row 13. Same as 1.
Row 14. Same as 2. 168 sts
Row 15. Same as 3.
Row 16. Same as 4. 169 sts
Row 17. Same as 5.
Row 18. Same as 6. 170 sts
Row 19. Same as 7.
Row 20. Same as 8. 171 sts
MC = 21g
Section #8 – Checkered Lace (MC)
6-stitch repeat between red lines, work Rows 1 – 12 once, then rows 1 – 8 again (20 rows)
Section #9 (MC and CC)
“Yarn Chicken” Striping
With remaining MC and CC, work garter stitch stripes in desired striping sequence leaving at least 4g for bind off. (My bind off used approx. 3g). End after WS row.
Row 1. (RS) K1, kfb, knit to last 3 sts, k2tog, k1.
Row 2. (WS) Knit to last 2 sts, kfb, k1. (1 st increased)
Repeat Rows 1 and 2 until desired length leaving at least 4g for bind off, ending after Row 2.
Below is my striping sequence. Depending on your remaining yardage, you may have more or fewer rows.
Row 1. With CC, same as 1.
Row 2. With CC, same as 2. 172 sts
Row 3. With MC, same as 1.
Row 4. With MC, same as 2. 173 sts
Row 5. With MC, same as 1.
Row 6. With MC, same as 2. 174 sts
Row 7. With CC, same as 1.
Row 8. With CC, same as 2. 175 sts
Row 9. With MC, same as 1.
Row 10. With MC, same as 2. 176 sts
Row 11. With MC, same as 1.
Row 12. With MC, same as 2. 177 sts
Bind Off
Using remaining color of choice, bind off stitches using Channel Island Bind Off.
Channel Island Bind Off
See Channel Island Bind Off Video
- Cast on 2 sts using the Knitted Cast On.
- With right needle tip, lift the second stitch on the left needle over the first stitch and off the needle.
- With right needle tip, lift the now-second stitch on the left needle over the first and off the needle.
- Slip the first stitch to the right needle as if to purl.
- On left needle, k2tog. There are now 2 stitches on right needle.
- On right needle, lift the right stitch over the left stitch and off the needle.
- Slip the stitch on the right needle to the left needle.
Repeat Steps 1 – 7 to last stitch. Cut yarn and pull tail through last stitch.
After bind off:
MC = 4g, 2nd skein of CC = 5g. ©2019 Michelle Hunter