With our lovely pillow front complete, it is time to knit the top half of the back of the pillow known as the buttonhole band. This section will overlap the lower back and include the buttonholes to close the pillow. Previous fans will recognize my signature cable-centered buttonholes. I love how the buttons will nestle inside of the diamonds for a polished finish.
Be sure to place a lifeline through the last row of the pillow front prior to beginning the buttonhole band to aid in centering the pillow in the finishing and to protect your hard work.
This section marks a return to the Twisted Rib as worked in Section A. Work the Twisted Rib until the rib measures 7″ from the lifeline or 2″ shorter than the desired length. The upcoming cabled buttonhole section will measure approximately 2″ to add to the length for a total of 9″ from the end of the front to the bind off. The goal is have the top overlap the bottom by about 1 1/2 to 2″.
If your pillow front was slightly longer or shorter than mine, you will need to adjust this length. I recommend stretching your piece over the pillow form to assess your required length. Pillow forms vary in the amount of filling so it is best to test the knitting on your form. If your pillow front is longer, then knit the rib section shorter. If your front is shorter, then knit the rib section longer. The yarn and ribbing are very stretchy and it is easy to get a great fit. I stretched the fabric quite a bit over my pillow form for a snug fit.
Prior to beginning the buttonhole section, place another lifeline through the last row of ribbing. This lifeline will be handy need to go back and alter the length after completing the buttonholes.
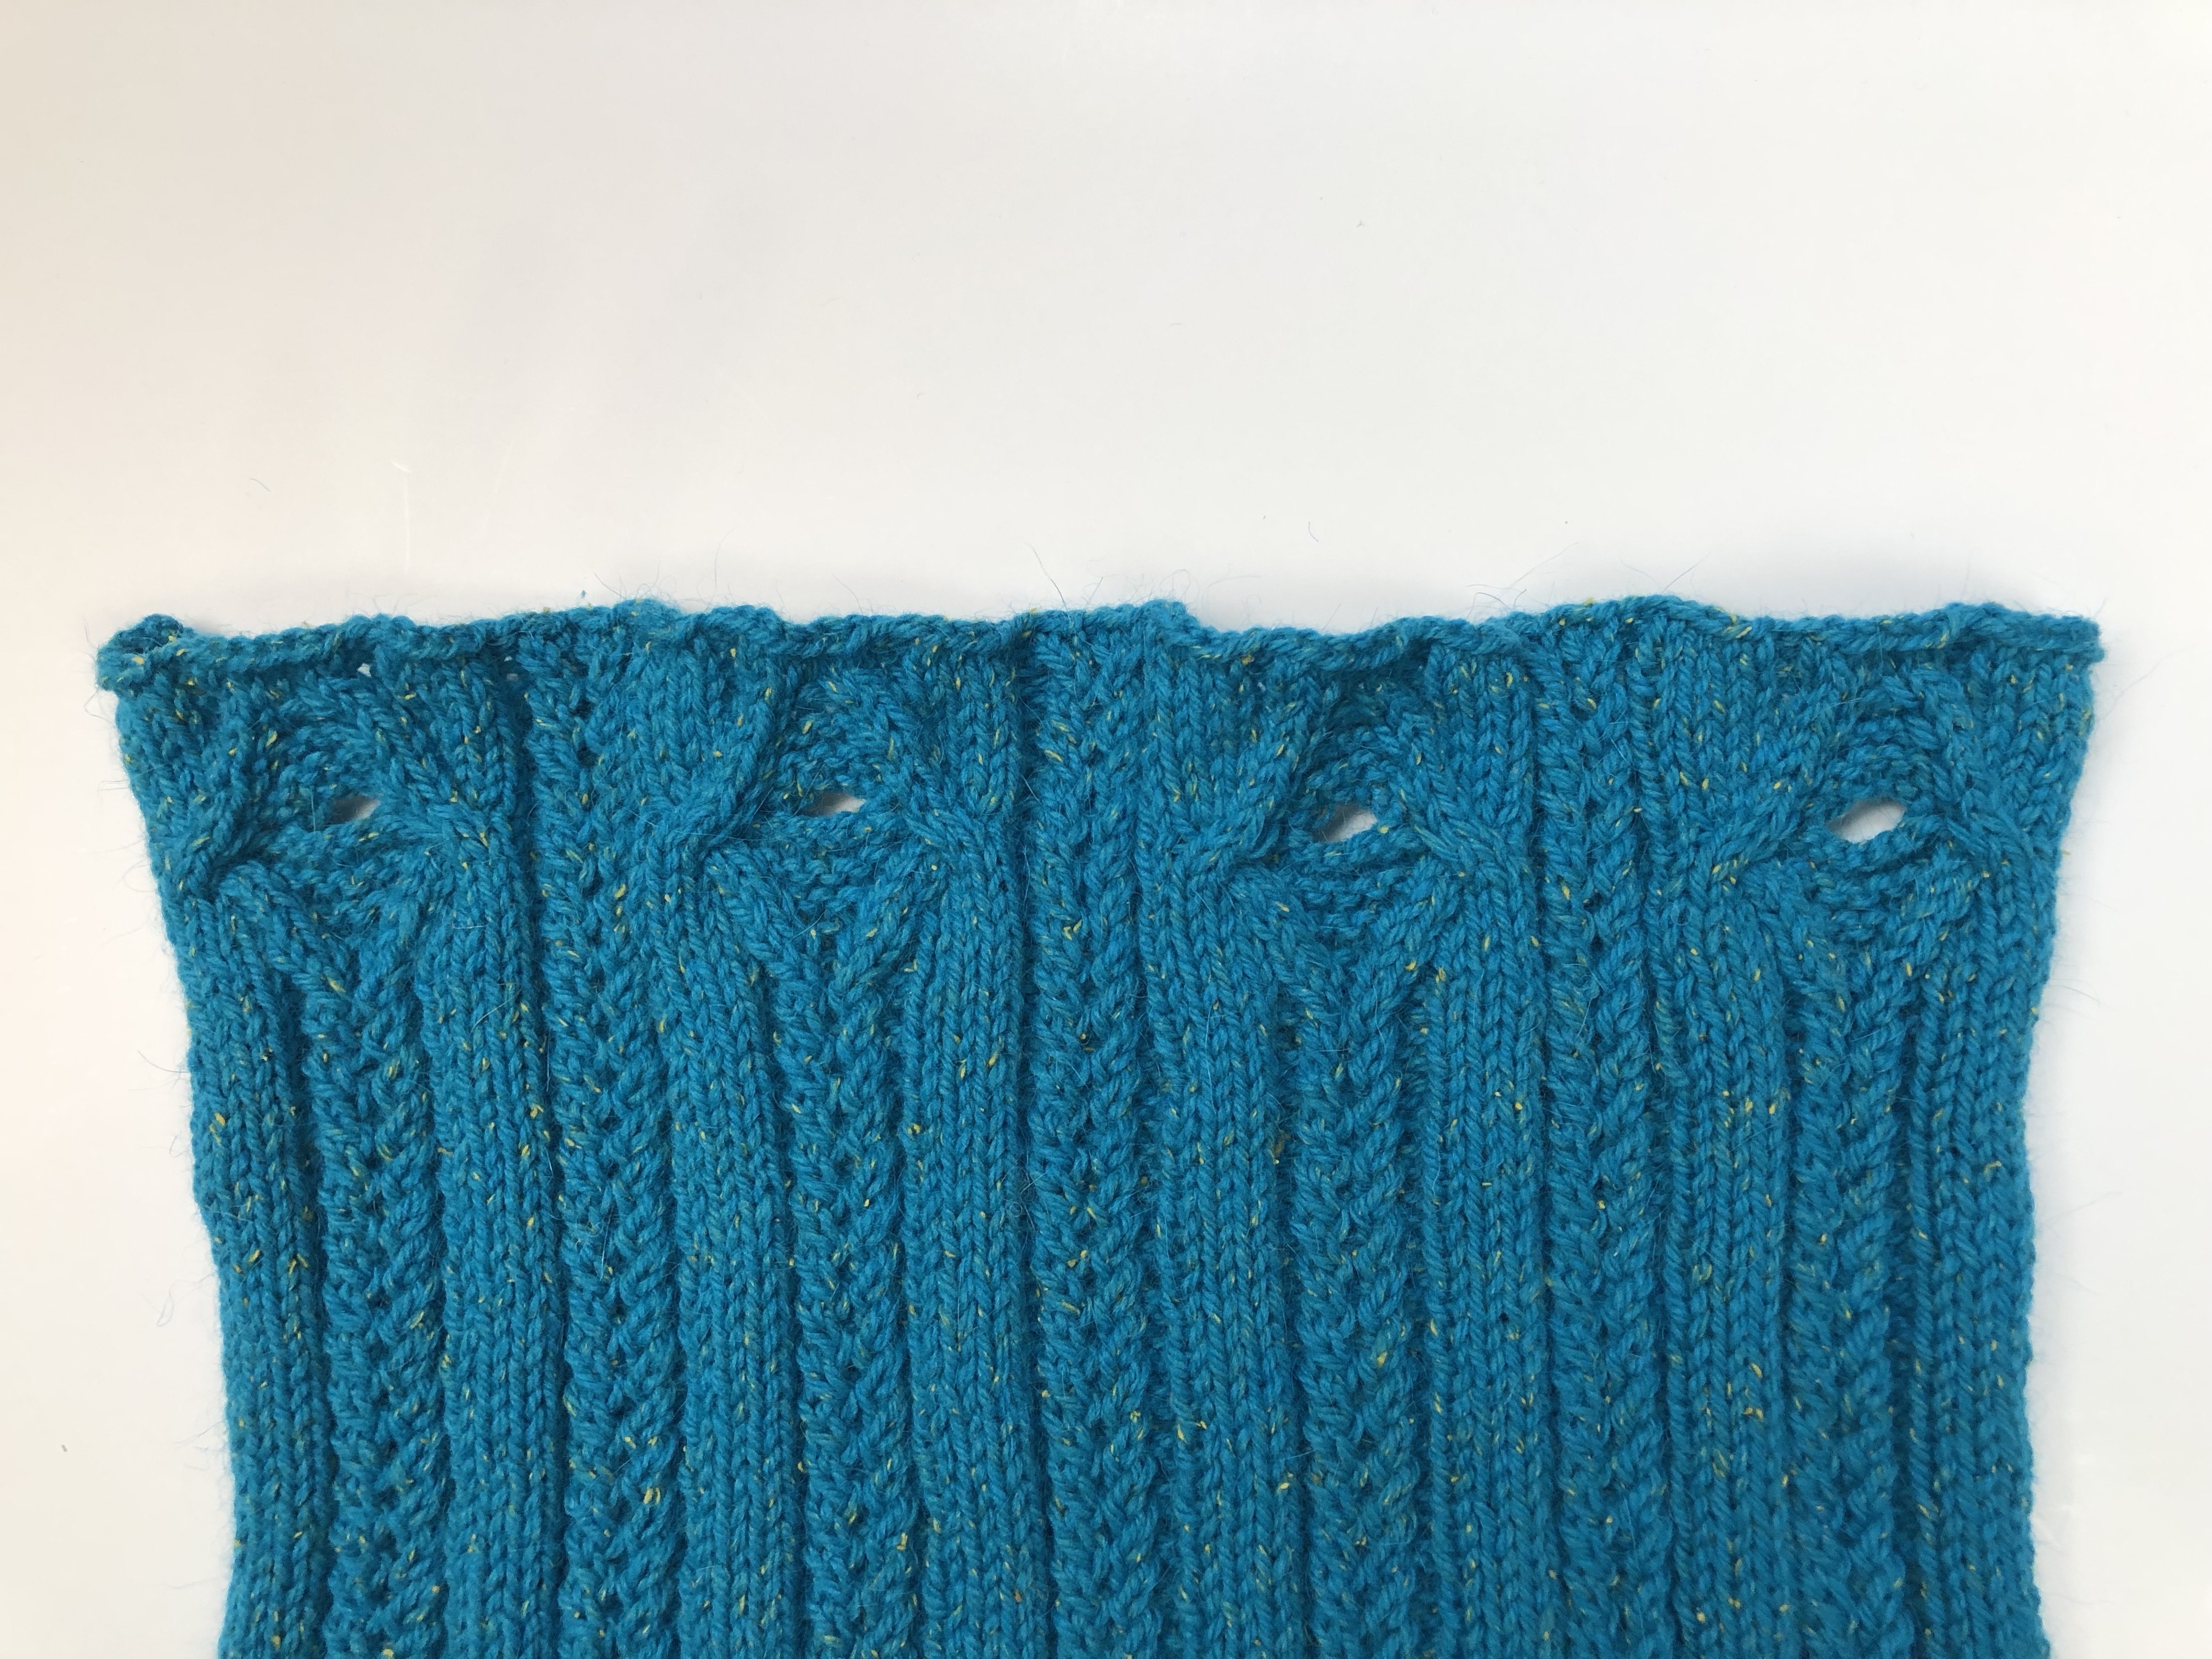
My favorite buttonhole is a one-row style that is sturdy and tidy. The buttonholes are tucked inside of the diamond cables that are similar to those on the front of the pillow. The buttonholes are five stitches wide to accommodate the pretty buttons you have chosen. My Buttonhole video will walk you through all of the buttonhole steps. The video shows a three stitch buttonhole, but it is the same procedure over any number of stitches.
The final few rows of the buttonhole section contain some oddly placed purl stitches along the top edge. This is not a mistake in the pattern! These stitches help keep the bind off edge from flaring. Just trust the pattern and work as directed.
Finally the stitches are bound off in pattern. This is typically described as work the knits in knit and the purls in purl while executing the standard bind off. The same holds true here. Just remember that left and right twists are considered knit stitches so treat both of the twist stitches as knit. This final edge treatment will keep the edge clean and sophisticated.
My fourth skein weighed 26 grams after binding off leaving plenty for tassels. My four tassels used 5g of yarn each for those keeping track of yardage.

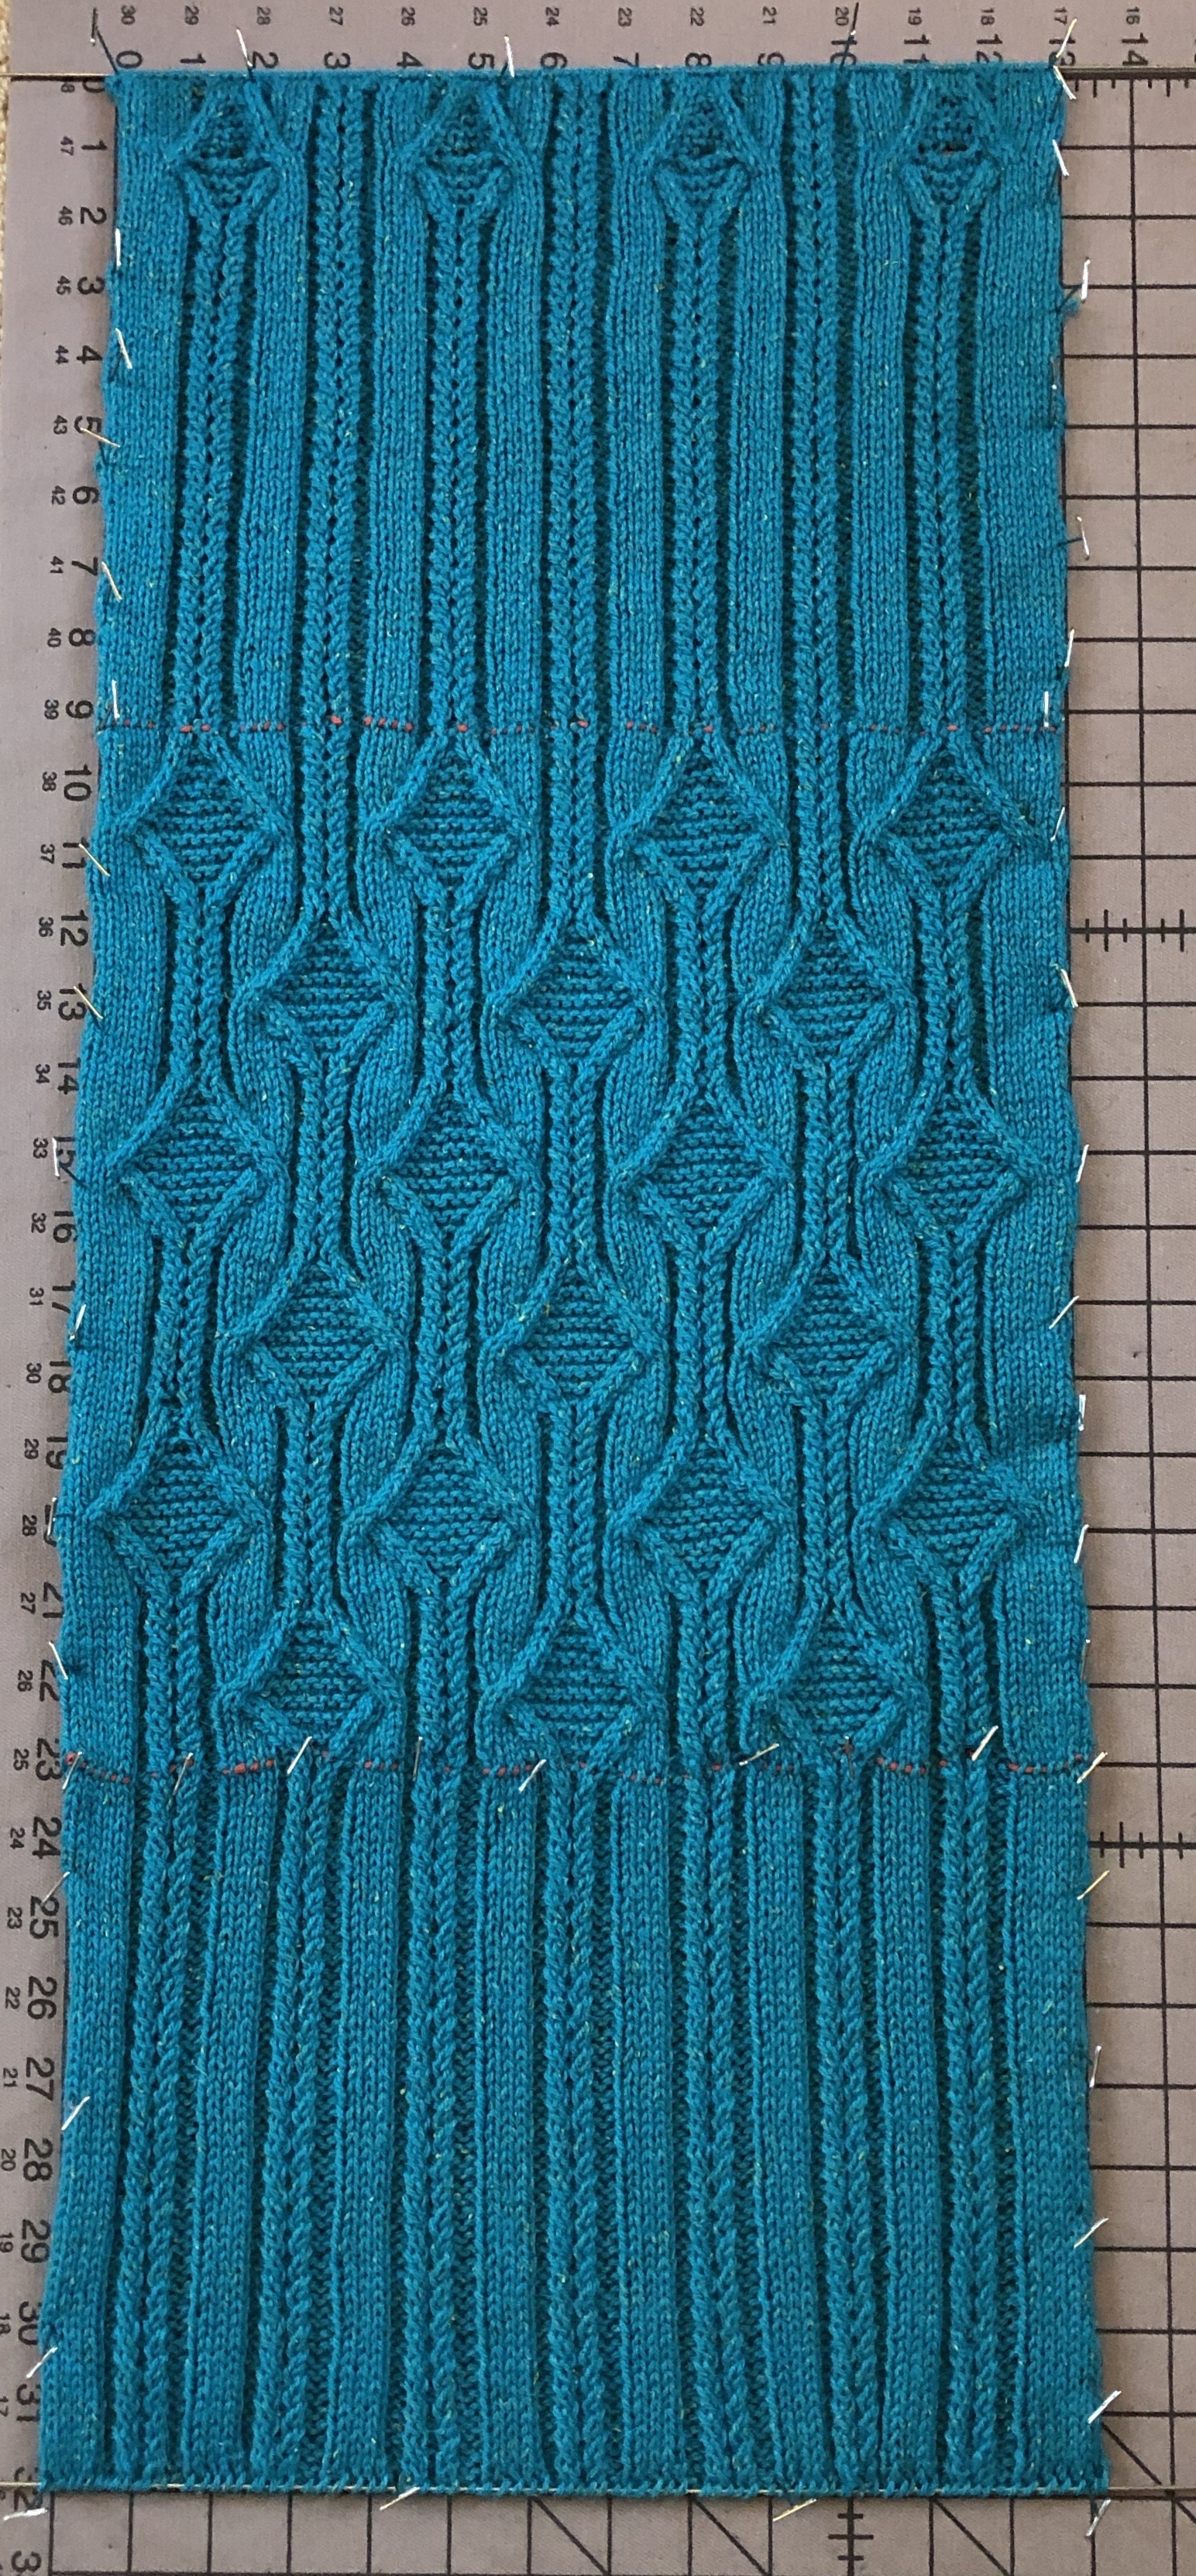
The above photo shows my completed piece unblocked. I chose to block the fabric for several reasons. The fiber content of Kenzie allows the yarn to soften and bloom after a wet blocking. Blocking also allowed me to coax any stubborn stitches into shape and create a defined sharp top and bottom edge. As you can see below, I ran blocking wire though the the cast on and bind off edges for a razor sharp edge. Pins were sufficient for the sides to keep the width to approximately 13″. For wet blocking you can either pin into place and then spray with water or give the fabric a bath before pinning. My Blocking video will walk any newbies through the process.
Next week I will have a comprehensive pillow seaming video ready for your viewing. It will walk you through every step of the finishing process to give you a professional-looking pillow. I will also address those adorable tassels!
Until next week, happy knitting!
Michelle
Part Three
Click here to download printable version
![]()
Buttonhole (5-stitch) – Sl 1 wyif, (sl 1 wyib, psso) 4 times, return the last bind off stitch to left hand needle, turn. Using Cable Cast On, cast on 5 stitches, turn. Sl 1 wyib from left hand needle, pass last cast on stitch over this stitch and off the needle. See Buttonhole Video
For all Cables See Cables Video
C1BK2 – slip next stitch onto cable needle and hold in back of work, knit next 2 stitches from left hand needle, then k1 from cable needle.
C1BK2P – slip next stitch onto cable needle and hold to back of work, k2, p1 from cable needle.
C2FK1 – slip next 2 stitches onto cable needle and hold to front of work, knit next stitch from left hand needle, k2 from cable needle.
C2FPK2 – slip next 2 stitches onto cable needle and hold to front of work, p1, k2 from cable needle.
C4B – slip next 2 stitches onto cable needle and hold in back of work, knit next 2 stitches from left hand needle, then knit 2 stitches from cable needle.
C4F – slip next 2 stitches onto cable needle and hold in front of work, knit next 2 stitches from left hand needle, then knit 2 stitches from cable needle. cn – cable needle.
LT (Left Twist) – slip as if to knit, slip as if to knit, return both slipped stitches to left needle. Knit second stitch through the back loop, then knit both stitches together through the back loop. See Left Twist – Mirror Image to Right Twist Video
RT (Right twist) – knit two stitches together and without taking stitches off left hand needle, reknit the first stitch and remove both stitches from left hand needle.
See Right Twist Video

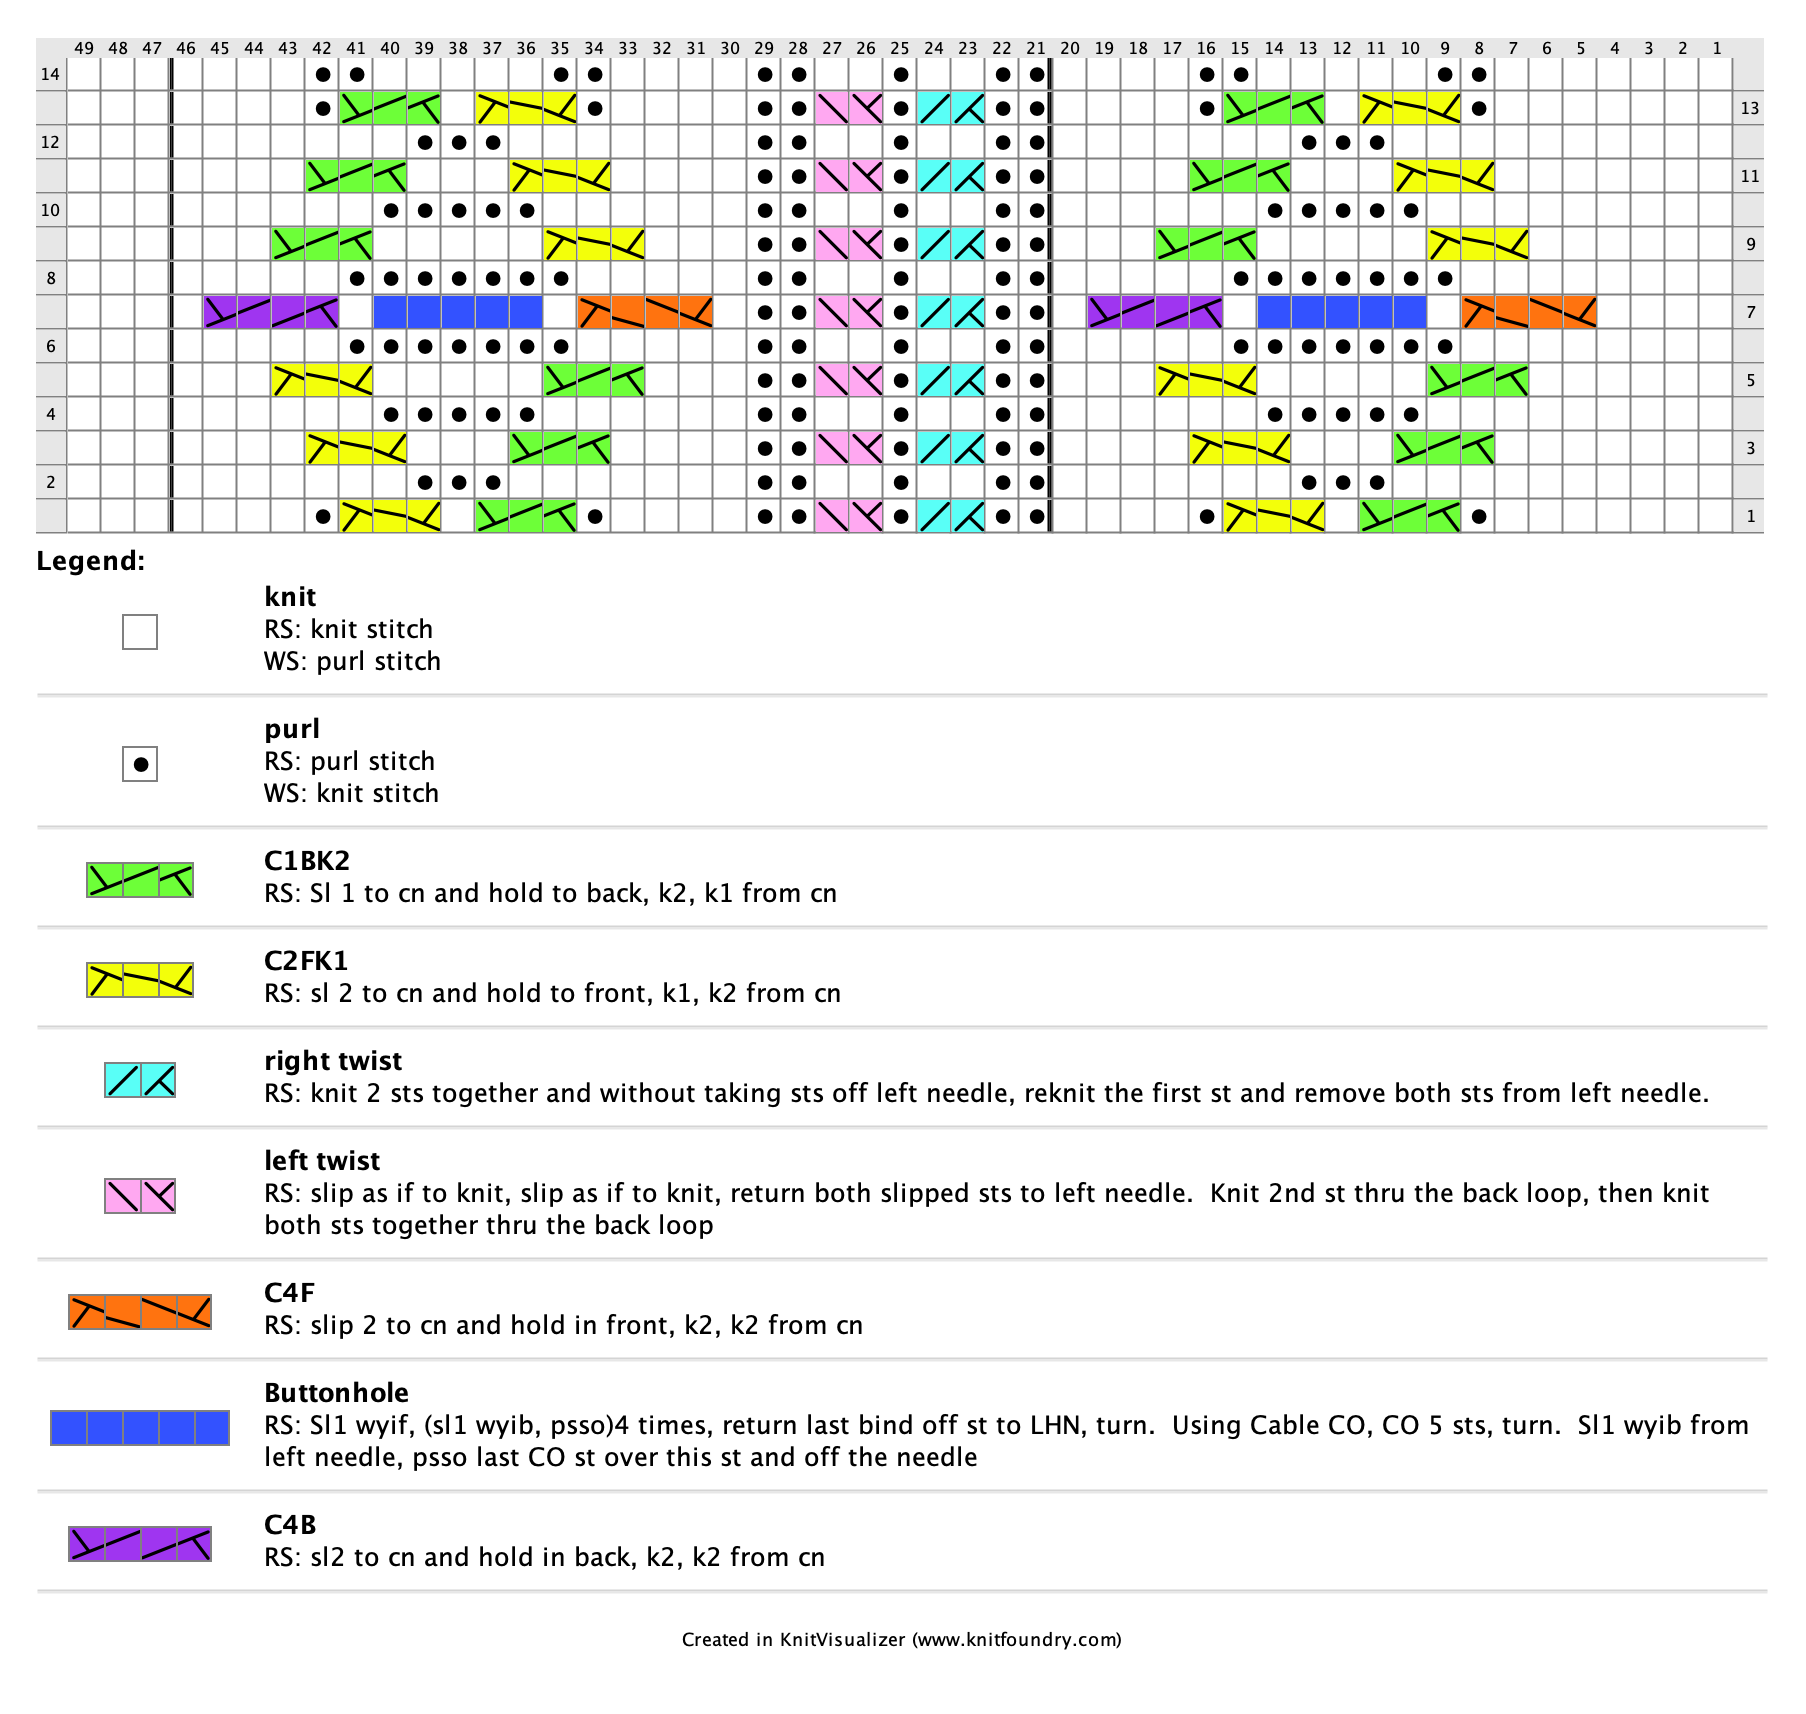
Section C – Buttonhole Band
Place lifeline through last row of Front to aid in later finishing.
Work Twisted Rib as on Button Band until piece measures 7” from conclusion of Front ending after Row 2. (I joined 4th skein when section measured 5”.)
Twisted Rib – mult. of 13 + 10, 2 rows (See Chart A below)
Row 1. (RS) K7, *p2, RT, p1, LT, p2, k4; repeat from * to last 3 sts, k3.
Row 2. (WS) P3, *p4, k2, p2, k1, p2, k2; repeat from * to last 7 sts, p7.

Buttonhole Cable – mult. of 26 + 23, 14 rows (See Chart C below)
Work the following 14 rows once ending after Row 14.
Row 1. (RS) K7, p1, C1BK2, k1, C2FK1, p1, k4, *p2, RT, p1, LT, p2, k4, p1, C1BK2, k1, C2FK1, p1, k4; repeat from * to last 3 sts, k3.
Row 2. (WS). P3, *p7, k3, p7, k2, p2, k1, p2, k2; repeat from * to last 20 sts, p7, k3, p10.
Row 3. K7, C1BK2, k3, C2FK1, k4, *p2, RT, p1, LT, p2, k4, C1BK2, k3, C2FK1, k4; repeat from * to last 3 sts, k3.
Row 4. P3, *p6, k5, p6, k2, p2, k1, p2, k2; repeat from * to last 20 sts, p6, k5, p9.
Row 5. K6, C1BK2, k5, C2FK1, k3, *p2, RT, p1, LT, p2, k3, C1BK2, k5, C2FK1, k3; repeat from * to last 3 sts, k3.
Row 6. P3, *p5, k7, p5, k2, p2, k1, p2, k2; repeat from * to last 20 sts, p5, k7, p8.
Row 7. K4, C4F, k1, buttonhole, k1, C4B, k1, *p2, RT, p1, LT, p2, k1, C4F, k1, buttonhole, k1, C4B, k1; repeat from * to last 3 sts, k3.
Row 8. P3, *p5, k7, p5, k2, p2, k1, p2, k2; repeat from * to last 20 sts, p5, k7, p8.
Row 9. K6, C2FK1, k5, C1BK2, k3, *p2, RT, p1, LT, p2, k3, C2FK1, k5, C1BK2, k3; repeat from * to last 3 sts, k3.
Row 10. P3, *p6, k5, p6, k2, p2, k1, p2, k2; repeat from * to last 20 sts, p6, k5, p9.
Row 11. K7, C2FK1, k3, C1BK2, k4, *p2, RT, p1, LT, p2, k4, C2FK1, k3, C1BK2, k4; repeat from * to last 3 sts, k3.
Row 12. P3, *p7, k3, p7, k2, p2, k1, p2, k2; repeat from * to last 20 sts, p7, k3, p10.
Row 13. K7, p1, C2FK1, k1, C1BK2, p1, k4, *p2, RT, p1, LT, p2, k4, p1, C2FK1, k1, C1BK2, p1, k4; repeat from * to last 3 sts, k3.
Row 14. P3, *p4, k2, p5, k2, p4, k2, p2, k1, p2, k2; repeat from * to last 20 sts, p4, k2, p5, k2, p7.
Bind off stitches in pattern. See Bind Off in Pattern video
(My 4th skein weighed 26g after bind off)