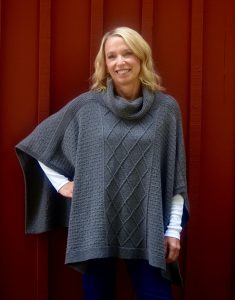
Match Play is no longer a free pattern!
The KAL has expired and the complete pattern may be purchased on Ravelry. The helpful tips tips and information will continue to be available. Just scroll down to find the pertinent section.
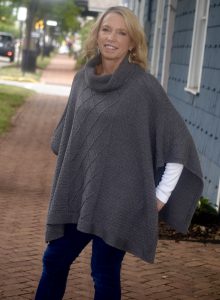
I’m so excited to reveal the completed Match Play! I knit the reversible Option #1 version seen above. I can’t wait to see what version you will be wearing!
Side Two
The neck shaping will complete Side Two. Option #1 and #3 are worked the same. Option #2 sneaks in a k3tog in Row 1 to remove the added increase stitch worked way back in the set up.
Finishing
Prior to seaming the sides together, I blocked my pieces to the stated dimensions. I blocked the edges with wires and then sprayed them with water until saturated. Once wet, stitches can be corralled into shape and any wonky edges can be flattened. See Blocking or Blocking With Wires Video
Shoulders
Shoulders require a sturdy seam since they must withstand the weight of the garment as it hangs on the body. A flimsy seam will pull apart and cause the poncho to sag. In Match Play, we are joining the front to the back with a three-needle bind off. This technique creates a firm seam as the stitches are bound off – so slick and simple! See Three-Needle Bind Off video
The bind off gets its name from the three needles required to work the seam. Place the 76 resting stitches from one shoulder onto a circular needle and its corresponding shoulder stitches onto a second circular needle. These needles can be any size since the stitches will be knit onto a third needle. (Stitches take on the size of the needle they are knit onto.) For the third needle, use the #6 – 16″ circular (smaller size) needle.
Very importantly, the three-needle bind off is worked with right sides together. The needles holding the stitches are parallel and pointing to the right. The tail remaining from one of the pieces serves as the working yarn for the bind off. You will have two tails hanging from the sides, but only one is used. (I provided this so that no matter where you start, your work will look like my video.) Insert the third needle into the first stitch on each needle and knit the two stitches together. One stitch is now on the right hand needle. Again, insert the third needle into the first stitch on each needle and knit the two stitches together. There are now two stitches on the right hand needle. With one of the left needles, lift the first stitch over the second stitch and off the right hand needle. Repeat until one stitch remains. Cut the yarn and draw it through the last stitch. I prefer to bury the shoulder tails into this seam.
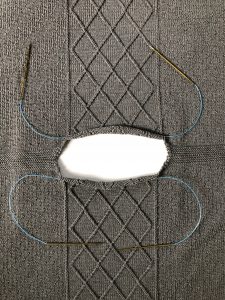
Repeat the same process for the second shoulder, leaving the center 48 stitches on each side on a holder. The photo below shows both shoulders seamed with the center stitches resting on extra needles serving as holders.
Neck
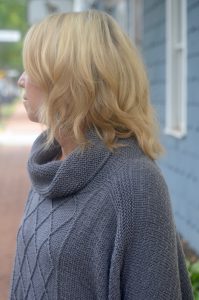
The poncho is topped off with a softly draped cowl. The cowl is knit in garter stitch to complement the lower and side garter edges.
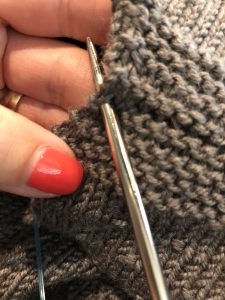
Using a #6 – 16″ circular needle and starting at left front shoulder, join yarn and pick up and knit 4 stitches – one in each garter ridge. When picking up and knitting, work from right to left with Right Side facing. Insert needle tip from front to back between the edge stitch and the second stitch at the ridge (see photo below). Wrap the yarn around the needle tip as if to knit and draw through a loop to the Right Side – one stitch has been picked up and knit. If you are new to picking up stitches, I recommend watching my Pick Up and Knit Video.
Next, knit the held 48 center stitches onto the needle. Pick up and knit four stitches up right front shoulder (one in each ridge). Moving to the back, pick up and knit four stitches down right back shoulder (one in each ridge), knit back center 48 stitches on the needle, and finally, pick up and knit four stitches up left back shoulder (one in each ridge). There are 112 stitches on the needle.
Place a marker and begin working in garter stitch. Unlike garter stitch worked flat where every row is knit, garter in the round alternates purl and knit rounds. Round One is worked in purl with Round 2 worked in knit. Repeat Rounds 1 & 2 until neck measures 4″. Change to #7 – 16″ circular needle and knit another 4″ for a total neck height of 8″. Working garter in the round leaves a faux “seam” at the beginning of the round which appears as an extension of the shoulder seam.
Bind Off
The I-cord bind off adds stability to edges and is completely reversible making it a perfect choice for neck edges. I usually find that a three stitch version works well and that is the size used here and demonstrated in my video, I-cord Bind Off. You can use both ends of your circular needle for the bind off, but I find it more comfortable to use a double pointed needle (#7 in this instance) as my right hand needle.
Limited Time Only
Remember that the pattern is free until December 1st. I have a condensed version of the complete pattern for you to download here. Ravelry users can find the pattern here.
Thank You!
A big shout out to Skacel Collection, whose sponsorship brings you the knit along free of charge. They also generously supply prizes for all participants. To be eligible for the prize drawing, complete the poncho and submit the entry form by November 30th. Remember, every entry is a vote for these KALs to continue. Contest overview, rules and entry form are found here.
I also owe a big thank you to YOU! I am honored that you continue to choose to knit with me and grow your knitting skills. I have enjoyed hearing from you and following your progress. I will be back in the spring with another KAL. Be sure to subscribe to my newsletter to receive all of the updates and information as it is released.
Until next time, wishing you all happy knitting!
Michelle
Part Four
Click here to download printable version
CO – cast on
k2tog – knit two together. See K2tog Video
k2tog tbl – knit two together through the back loop. See K2tog tbl Video
k3tog – knit three together. See K3tog Video
RS – right side
sl – slip. See Slip Stitch Video
ssk – slip next stitch as if to knit, slip next stitch as if to knit, insert left needle into the front of these two slipped stitches from left to right and knit together. See SSK Video
st(s) – stitch(es)
WS – wrong side
wyif – with yarn in front
Option #1 and #3 – Neck Shaping
Note: Shoulders and neck are worked in garter stitch.
Left Neck
Row 1. (RS) Sl 1 wyif, knit to 3 sts before 2nd marker, k2tog, k1. Place 48 sts between 2nd and 3rd markers on holder. Place remaining 80 sts on a second holder. There are now 79 sts on Left Side. First and second markers may be removed.
Row 2. (WS) Working Left Neck sts only, knit across row.
Row 3. Sl 1 wyif, knit to 3 sts before end, k2tog, k1. (78 sts)
Row 4. Same as Row 2.
Row 5. Same as Row 3. (77 sts)
Row 6. Same as Row 2.
Row 7. Same as Row 3. (76 sts)
Row 8. Same as Row 2.
Cut yarn leaving long tail to be used for upcoming shoulder seaming. Place these stitches on a separate holder.
Right Neck
Return 80 stitches from second holder to needles, leaving center 48 stitches on holder.
With Right Side facing, rejoin yarn and begin at neck edge as follows:
Row 1. (RS) K1, ssk, knit to end. Remaining markers may be removed. (79 sts)
Row 2. (WS) Working Right Neck only, sl 1 wyif, knit to end.
Row 3. K1, ssk, knit to end. (78 sts)
Row 4. Same as Row 2.
Row 5. Same as Row 3. (77 sts)
Row 6. Same as Row 2.
Row 7. Same as Row 3. (76 sts)
Row 8. Same as Row 2.
Cut yarn leaving long tail to be used for upcoming shoulder seaming. Place these stitches on a separate holder.
Neck Shaping – Option #2
Note: Shoulders and neck are worked in garter stitch.
Left Neck
Row 1. (RS) Sl 1 wyif, k76, k3tog, k1. Place next 48 sts on a holder. Place remaining 80 sts on a second holder. There are now 79 sts on Left Side. First and second markers may be removed
Row 2. (WS) Working Left Neck sts only, knit across row.
Row 3. Sl 1 wyif, knit to 3 sts before end, k2tog, k1. (78 sts)
Row 4. Same as Row 2.
Row 5. Same as Row 3. (77 sts)
Row 6. Same as Row 2.
Row 7. Same as Row 3. (76 sts)
Row 8. Same as Row 2.
Cut yarn leaving long tail to be used for upcoming shoulder seaming. Place these stitches on a separate holder.
Right Neck
Return 80 stitches from second holder to needles, leaving center 48 stitches on holder.
With Right Side facing, rejoin yarn and begin at neck edge as follows:
Row 1. (RS) K1, ssk, knit to end. Remaining markers may be removed. (79 sts)
Row 2. (WS) Working Right Neck only, sl 1 wyif, knit to end.
Row 3. K1, ssk, knit to end. (78 sts)
Row 4. Same as Row 2.
Row 5. Same as Row 3. (77 sts)
Row 6. Same as Row 2.
Row 7. Same as Row 3. (76 sts)
Row 8. Same as Row 2.
Cut yarn leaving long tail to be used for upcoming shoulder seaming. Place these stitches on a separate holder.
Finishing
Block pieces to desired dimensions. See Blocking or Blocking With Wires Video
The center 48 sts on each Side One and Two remain on holders to be worked as neck. A shoulder seam is worked over the 76 sts on each side of neck.
Place 76 sts from one holder of Side One onto needle and corresponding 76 sts of Side Two onto a second needle. Working one shoulder seam at a time, with Right Sides together and using a third needle, bind off shoulder sts with attached long tail. See Three-Needle Bind Off Video
Repeat bind off for second shoulder.
Neck
See Pick Up and Knit Video
Using #6 16” circular needle and starting at left front shoulder seam, join yarn and pick up and knit 4 sts along left neck edge (1 st in each ridge).
Knit front center 48 sts from holder.
Pick up and knit 4 sts up right front shoulder (1 st in each ridge).
Pick up and knit 4 sts down right back shoulder (1 st in each ridge).
Knit back center 48 sts from holder.
Pick up and knit 4 sts up left back shoulder. (1 st in each ridge). 112 sts
Garter Stitch in the Round
Place marker and join in the round.
Round 1. Purl.
Round 2. Knit.
Repeat Rounds 1 and 2 until neck measures 4”.
Change to #7 16” needles and work an additional 4” ending after a purl round.
I-Cord Bind Off
See I-Cord Bind Off Video
Note: I find it comfortable to use a #7 dpn to assist in this bind off as right hand needle.
CO 3 sts, *k2, k2tog tbl, return sts to left hand needle; repeat from * to last st, cut yarn and pull through last stitch.

